 |
|
|
|
|
|
|
Weights / WW 2
| Max Ramp Taxi Weight |
|
| Max Takeoff Weight |
|
| Max Landing Weight |
|
| Max Zero Fuel Weight |
|
Weights / WW 1
| Max Ramp Taxi Weight |
|
| Max Takeoff Weight |
|
| Max Landing Weight |
|
| Max Zero Fuel Weight |
|
Speeds
| Vmo / Mmo WW1
Auto Pilot Disengaged |
/ 0.710 Mach |
| Vmo / Mmo WW2 |
|
| Vfe 12 Deg
20 Deg 40 Deg |
250 kts 180 kts |
| Vle / Vlo
|
140 kts |
| Vsb |
|
| Max Tire Groundspeed |
|
| Va
19,000 17,500 15,000 13,500 |
217 kts 204 kts 182 kts 170 kts |
| DV Window Open |
|
Operational Limits
| Max Alt T.O. & LDG |
|
| Max Enroute Altitude |
|
| Max Alt. Flaps Extended |
|
| Min Temp T.O. & LDG |
|
| Max Temperature
Min Temperature |
-54 C |
| Max Tailwind T.O/ LDG |
|
| Max Runway Slope |
|
| Max Fuel Imbalance
Enroute Takeoff / Landing |
300 lbs |
| Load Factor Limit
Flaps Up Flaps Extended |
+ 2.0 /- 0.0 G |
| Avgas / Max Altitude |
|
| Max Alt / AP & YD Inop
Flaps 20 or More |
|
Vmc & Crosswind
| CROSSWIND (DEMONSTRATED)
WESTWIND 2 WESTWIND 1 |
20 KTS |
| VMCG (WESTWIND 2)
FLAPS 0 AND 12 FLAPS 20 |
90 KTS |
| VMCG (WESTWIND 1)
FLAPS 12 AND 20 |
|
| VMCA (WESTWIND 2)
FLAPS 0 AND 12 FLAPS 20 |
104 KTS |
| VMCA (WESTWIND 1)
FLAPS 12 AND 20 |
|
Engine Limitations
Garrett TFE 731-3B
|
|
|
|
|
|
|
|
|
|
917 C Abv 927 C |
10 Sec Hot Section |
| Takeoff |
|
|
|
|
| Max Continuous |
|
|
|
|
| Max Overspeed |
103.0% to 105.0% |
105.0% |
|
5 Seconds |
START TIMES
| 10% N2 TO LIGHT-OFF |
|
| LIGHT-OFF TO IDLE |
|
| AIRSTART - FUEL FLOW TO 60% N2 |
|
Engine Oil System Limitations
| Max Oil Temp to 30,000 ft
above 30,000 ft |
140 C 149 C |
| Max Oil Temp to open cap |
|
| Min Oil Temp for Start |
|
| Max oil consumption / 25 Hours |
|
| STARTING / Lightoff --> Oil Press |
|
| IDLE |
|
| TAKEOFF, CLIMB CRUISE |
|
| TRANSIENT |
|
Systems
|
|
The ailerons and elevator and rudder on the
Westwind are manually actuated by the pilots. The aircraft does have
an autopilot. The ailerons and elevator may be moved by the autopilot
servos, and the rudder is equipped with a yaw damper.
The flight controls on the Westwind Jet are operated by push
/ pull tubes and cables. They are manually actuated by the pilot.
They are servo controlled only when the auto pilot is in use. The
yaw damper system augments the displacement of the rudder, but may be easily
overpowered by the pilot. The trim systems, flaps, yaw damper and
autopilot are electric.
Ailerons
The ailerons are located on the aft outboard section of each wing. Aileron trim is provided by a DC electric motor that moves a tab located on the aileron itself. On the Westwind, as with most airplanes equipped with a tiller for nosewheel steering, the co-pilot holds the aileron & elevator controls on the takeoff until the rudder is effective enough for directional control on the ground. This usually occurs between 80 and 100 knots. When this speed has been reached, the co-pilot calls it out, and the captain responds, "I have the yoke".
Elevator
The Westwind is equipped with an elevator for pitch control, and
a moveable horizontal stabilizer for pitch trim. The elevator is
moved manually by the pilot via push / pull tubes and cables. When
a pitch trim adjustment is desired, the horizontal stabilizer is moved
by one of two electric trim motors in the pitch trim system. The
main pitch trim motor is activated by switches on the pilot and co-pilot
control yokes. If for any reason the main pitch trim does not function,
or runs without input from the crew, it may be disengaged by pressing the
button on the inside right portion of the captains control yoke.
This not only turns off the main pitch trim, it makes the alternate trim
system available as well. This is indicated by the illumination of
a red light on the center pedestal. The toggle switch adjacent to
the light now controls the pitch trim.
To test the pitch trim system, run the normal
trim from each pilots yoke. When the trim is running, depress
the pitch trim cutout switch on the captains control wheel. This
should terminate any movement of the trim system. Now check the alternate
pitch trim by moving the alternate pitch trim switch. Press the red
lighted button that is next to the alternate pitch trim switch. This
will restore normal pitch trim operation. Verify that the main pitch
trim operates again, and set it to the takeoff position. NEVER test
any alternate or emergency trim system to the limit of its travel.
Alternate trim systems usually don't have electrical limit switches.
The system may jam, cost lots of money to fix, and the owner will be quite
pissed off and you may not be invited to fly that plane again.
Rudder
The rudder is actuated by tubes and cables via the rudder pedals on the cockpit floor. The pedals are adjustable forward and aft with a hand crank on the lower forward panel in front of each pilot. The yaw damper may be turned on after takeoff to enhance the yaw stability of the aircraft. The yaw damper provides the most noticeable improvement in the ride when flying in rough air.
Flaps
The flaps on the Westwind are operated by a 1.55 horsepower electric
drive motor. The motor is powered by the battery bus. The control
circuit is on the # 1 DC Distribution Bus. Flaps may be positioned
UP, 12 deg, 20 deg at 250 Kts, and 40 deg at 180 Kts. The drive motor
turns flex cables that operate jackscrews, thus extending or retracting
the flaps. A flap asymmetry protection system compares the left and
right flap positions. When a difference of 6.5 to 10 degrees exists,
the flaps will stop moving. They are to be left in that position
until repaired by maintenance.
The flap asymmetry protection system may be
checked by placing the flap unbalance switch to the left or right position
while the flaps are in motion. The flaps should stop until the switch
is released, then continue to the selected position. If the flap
asymmetry system activates during flap operation, return the flap selector
to the last setting and land with whatever flap setting you have.
Add 15 knots to Vref for flaps up, 10 knots for flaps 10, and 5 knots for
flaps 20 degrees.
Speedbrakes
The speedbrakes consist of single vented panels located on the top of each wing. They have the vents in them to minimize buffeting. The speedbrakes are hydraulically actuated and electrically controlled. There are no flight manual restrictions as to their use. They are deployed via a switch in the cockpit. Speedbrakes on the Westwind are fully extended, or retracted. They deploy when selected, and whenever the lift dump system is used.
Lift Dump
The lift dump system consists of large inboard spoilers on the upper surface of the wing roots, and the speedbrakes. In order for the lift dump system to deploy, both main gear squat switches must indicate that the aircraft is on the ground, both throttles must be at idle, and lift dump must be selected via the lift dump switch. Like the speedbrakes, the lift dump system is hydraulically actuated and electrically controlled. Do not attempt to operate or even arm the lift dump system in flight. Worst case, it will cause a crash, and in any case, the other pilot may want do demonstrate the proper use of the crash ax on your head.
Landing Gear
The landing gear is hydraulically actuated and mechanically controlled. The only electrical items related to the gear are the gear indication, warning, squat switch functions, and anti-skid. With loss of electrical power, the gear may be extended normally, but will not retract because of the down lock solenoid. If you are unfortunate enough to have a hydraulic failure, the gear may free fall to the extended position if the fluid trapped in the uplocks leaks out. Prior to a long over water flight, some operators check the uplocks by jacking the airplane, retracting the gear, bleeding off the hydraulic pressure, and letting the aircraft sit for two or three hours to see if the uplocks hold. Israeli Aircraft makes fine airplanes, however, there are a few things that indicate some level of brain damage in one or more members of their design team. This is one of them. The range and speed of the airplane is somewhat more limited with the gear down.
Brakes
The normal braking system requires main system hydraulic pressure.
If electrical power is lost, brakes will work, however, the anti-skid
system will be inop, as it requires electrical power.
The emergency braking system uses an electric
hydraulic pump to actuate the aft pads pucks only. If the main hydraulic
system fails, the emergency brake system will stop the airplane.
The emergency brakes need not be selected. When the main hydraulic
system loses pressure, the brake pedals will feel soft and will deflect
to a much greater angle. Depressing the brake pedals to this increased
angle activates the emergency brakes. The emergency hydraulic pump
is activated whenever the gear is not on the uplocks. A pressure
switch turns the pump on and off to regulate the pressure from 750 to 1100
psi. Emergency brakes are not available without electric power.
Thrust Reverse
The thrust reversers are electrically controlled and hydraulically
actuated. They will not function without electrical power.
They are actuated by the main hydraulic system, or in the event that it
fails, their own accumulator. If main hydraulic pressure is lost,
and the hydraulic low pressure light on the thrust reverser panel is not
illuminated, the accumulator is charged and you should get at least one
cycle of thrust reverse. The reversers are locked in the stowed position
by a locking pin. When reverse is selected, the locking pin is retracted
by the "BAS". BAS stands for Big Ass Solenoid. The BAS is overriding
a very powerful spring, and gets real hot real quick. This is why
reverse thrust is limited to 1 minute at a time. It does not take
more than that to stop the airplane with reverse alone.
|
|
Fuel Tanks
The fuel system on the Westwind Jet is fairly simple. Fuel is stored in the fuselage, wings, and wing tip tanks. Fuel is pumped from the left and right fuselage tanks to their respective engines. The fuselage tanks are connected by two interconnect manifolds and valves. The valves are DC operated via a single rotating switch in the center of the lower overhead panel. When the valves are open, fuel may flow freely between the left and right fuselage tanks. There is no way to pump fuel from one side to the other. Gravity is the only help here.
The fuselage tanks are gravity fed from the wing tanks. The pilot has no control of this, as there are no valves between the wings and fuselage. The wing tanks are replenished by the tip tanks. First half of the tip tank fuel gravity feeds into the wings. The remaining fuel is pumped from the tips to the wings via jet pumps. This fuel transfer may be selected by the crew, or set to "Auto". In any case, if the transfer has not occurred by the time 6600 Lbs of fuel remain, place the switch in transfer, and verify that the transfer is taking place. Landing with fuel in the tips is prohibited.
FUEL CAPACITY
WESTWIND 2
|
|
|
|
| FUSELAGE |
|
|
| LEFT WING |
|
|
| RIGHT WING |
|
|
| LEFT TIP |
|
|
| RIGHT TIP |
|
|
| AUXILIARY |
|
|
| TOTAL |
|
|
WESTWIND 1
|
|
|
|
| FUSELAGE |
|
|
| LEFT WING |
|
|
| RIGHT WING |
|
|
| LEFT TIP |
|
|
| RIGHT TIP |
|
|
| TOTAL |
|
|
| AUX OPTIONAL |
|
|
| TOTAL |
|
|
Fuel Pumps
The Westwind Jet has two electric boost pumps in each fuselage tank, a controllable jet pump in each tip tank, and a jet pump in the lower forward section of each fuselage tank. Each engine is equipped with a high pressure engine driven fuel pump. If this puppy does not work, find a hotel because you're stuck!
Main Fuel Pumps
The main fuel pumps are 28 Volt DC Electric. The left main pump is powered by the #2 or Right Main DC Bus, and the right main pump is powered by the #1 or Left Main DC Bus. They should be operated from just prior to engine start, until the engine has spooled down to below 10% N2 RPM on shutdown. If the fuel pressure drops to below 7 PSI, indicating failure of the main fuel boost pump, the alternate boost pump will come on. The alternate and main pumps are powered from different electrical busses, so loss of one bus will not disable both boost pumps on the same side.
Alternate pumps must be on before selecting main pumps. Selecting main pumps first will result in the alternate pump turning on when the main is selected. The only way to get a main pump on line without the alternate pump operating first is to pull the "Alternate Boost Pump" circuit breaker. The pressure switch is then disabled because it is on the same circuit breaker as the alternate pump itself.
Alternate Fuel Pumps
The alternate fuel pumps are also 28 Volt DC Electric. The left alternate pump is powered by the #1 or Left Main DC Bus, and the right alternate pump is powered by the #2 or Right Main DC Bus. They are selected just prior to engine start. The alternate boost pumps must be on prior to selecting the main pumps, as the 7 PSI fuel pressure switches will turn on the "Alternate" if the main pumps are selected first. When the main pumps are turned on when no pressure exists in the fuel system, the pressure switches turn on the alternate pump prior to the main pumps having enough time to build up the fuel pressure.
Jet Pumps
The jet pumps get their power from the boost pumps. The jet pumps in the fuselage tank are for the purpose of keeping the electric fuel pumps supplied with fuel during nose down attitudes when the fuel level is low. These pumps are on whenever the boost pumps are operating. The jet pumps in the tip tanks perform two functions. They transfer fuel form the wing tips into the wings. They are also used to dump fuel if necessary.
Normal Operation
Prior to engine start, the fuel pump switches are set to "Main". This will cause the alternate pumps to come on, as indicated by their amber annunciator lights. "Alternate" is then selected. After the engines are started, the boost pumps are then selected to "Main". The switch must be moved quickly from alternate to main through the off position, or the 7 PSI pressure switch will put you right back into alternate. If this happens, you may say a bad word.
The "Fuel Transfer Switch" controls the transfer of the tip tank fuel into the wings. It should be placed to Open, Closed, then to "Auto". This verifies the operation of the jet pump valves in the fuel transfer system. This should cause the fuel to transfer from the tips to the wings at the proper time. If the fuel transfer has not begun by the time the fuel quantity is down to 6600 Lbs, the pilot should place the transfer switch to the open position. Once the transfer is complete, the switch should be placed in the "Close" position.
Fuel Additive
There are no required fuel additives for the Westwind. The
inside of the fuel system is coated with a substance called Bunna N.
It is non nutrient and does not allow the fungus to grow upon it.
The fuel icing issue is resolved through the use of fuel heaters.
There operation is entirely automatic. It is not required, but nonetheless
a good idea to add Prist once every third or fourth fueling to keep the
water from accumulating in the fuel.
Refueling
There are two ways to refuel the Westwind. Single point refueling is the preferred method. If this is not available, the aircraft may be fueled through two fuel caps located on the top of the fuselage. Manual refueling valves are located between the wings and the wing tip tanks. These valves are opened by pulling down on the metal rods protruding from under the wing, where it is joined to the tip. When the valves are open, fuel may flow from the wing into the tip. When the valve is closed (UP) the fuel may flow only from the tip to the wing. These valves must always be closed prior to flight, otherwise a serious fuel imbalance may result. Maximum pressure for single point refueling is 55 PSI.
Fuel Dump
When it is necessary to dump fuel, verify that a fuel pump is
operating on each side, then depress the fuel dump switches on the overhead
panel. This will open the fuel dump valves in the bottom of the tip
tanks. It also activates the tip tank jet pumps to boost the fuel
dump. After the tip tanks are empty, the motive flow fuel that was
powering the jet pump is pumped overboard through the fuel dump valve.
If both the main and alternate pump on one side are inop, open the interconnect
valve to prevent a fuel imbalance. If no other pilot action is taken
and the system works properly, the dump should terminate at 950 pounds
per side, or about 1900 lbs total.
If you are going to dump a bunch of fuel,
do not do it in a holding pattern, as you may fly back through the fuel
vapor. This can cause you engines to do strange things, from overtemp
to a flameout. Notify ATC so another airplane does not fly through
your vaporized fuel.
|
|
The Westwind Jet is equipped with a single hydraulic system. Skydrol is the type of fluid used. Two engine driven hydraulic pumps power the system. An electric hydraulic pump is available for emergency braking, and to set the parking brake. The pressure gauge for the emergency system is direct reading, thus requires no electrical power. If you can remember only one thing about this airplane, PARKING BRAKE DOES NOT HOLD IF ANTI-SKID SYSTEM IS ON! If you don't remember this, the airplane will remind you by running into something!
Hydraulic Systems
|
|
|
| Nosewheel Steering |
|
| Landing Gear |
|
| Normal Braking | |
| Speedbrakes | |
| Thrust Reversers |
The main system can operate on one engine driven
hydraulic pump. If for any reason, the main system is inop, you have
the following ways to deal with this tragedy:
|
|
|
| Nosewheel Steering |
|
| Landing Gear |
|
| Normal Brakes |
(No Anti-Skid) |
| Speedbrakes |
|
| Thrust Reversers |
|
If the hydraulic pump on a failed engine is still good, a windmilling engine will provide some hydraulic pressure. Motoring of a failed engine may provide some hydraulic pressure for normal braking. If you have a main hydraulic system failure, don't be a hero. Stop the airplane, exit the runway only if it is safe to do so, and call for a tow.
Normal Operation
Do not forget to bleed the thrust reverser accumulator pressure prior to checking the fluid quantity. If you fail to bleed the accumulator, you will over fill the system, and get a reminder that skydrol is an effective paint remover. If you are going to add fluid, bleed off the reservoir head pressure so you don't get a face full of hydraulic fluid when you remove the cap. If you donut think this is important, look at what happened to Michael Jackson!
Turn the battery switch on, let the emergency hydraulic pump pressurize its system, and set the parking brake. During the first engine start, rest your feet on the brake pedals and feel the main hydraulic system pressure come up. Another way to determine that the hydraulic system pressure is up is to watch the thrust reverser low pressure annunciator light. It will go out when the main system charges the thrust reverser accumulator. Check the hydraulic pressure gauge. It will indicate properly only when an inverter is on, because it is AC Powered. The pressure gauge for the emergency hydraulic system is direct reading, and requires no electrical power unless it is dark and you need a flashlight. A match may work in an emergency. Use the fire extinguisher located in the cockpit if things get out of hand.
Nosewheel Steering
The nose wheel steering is controlled with a wheel type tiller
located on the left side panel of the cockpit. It will work any time
there is hydraulic pressure in the main system and the nose gear is down.
You will find it fairly touchy to operate. Go easy at high speeds.
On the preflight, you did hook up the nose steering, didn't you?
If not, the nose wheel may not come down when requested, or it may come
down with the wheels facing other than straight ahead. In this case,
you have a real problem. If there is any doubt, get out and check
it before you inadvertently sign up for a potentially wild and dangerous
ride, and an interesting interlude with the Feds after your release from
the local emergency room!
During the takeoff roll, start using the rudder
early. Use the nose steering to fulfill any steering needs that the
rudder won't handle. Doing this will really smooth out the ride.
Ride through one takeoff in the back of the airplane if you can.
This will show you that the people in the back don't get the sensation
of radical movement that you experience in the cockpit when the steering
is in use. When you reach between 80 and 90 knots, the rudder
should be sufficient. If this is so, the Captain places his (her
if female, their if multiple personality or Siamese twins) left hand on
the control yoke. At V1, the right hand leaves the thrust levers
and finds a new home on the yoke as well. Do not play with the tiller
in flight.
On the landing roll, the copilot takes the
yoke at 80 to 90 knots. Roll corrections that were in place are maintained
or adjusted as appropriate. The Captain then rests his hand on the
tiller, and steers with the rudder until the rudder is no longer effective.
Then the tiller is used for the remainder of the landing roll and taxi.
Brakes
The brakes on the Westwind are hydraulic. Normal brakes use pressure from the main hydraulic system. This pressure is used to operate forward and aft calipers for each wheel. Brake pressure is modulated with the brake pedals. Anti skid protection is provided by an electrical anti skid system. This system is good, but does not like to share the stage with the parking brake. If the parking brake is set, and the anti skid is on, or is turned on, the brakes get very unhappy and give up. Yes, the anti skid thinks the wheels are locked, because they are, and releases brake pressure. This can be a real pain in the ass if you forget at the wrong time.
Landing Gear
The landing gear is hydraulic. What a
surprise! It is powered by the main hydraulic system. The normal
extension and retraction of the gear is not dependent upon electrical power,
as in many aircraft. The gear handle on the Westwind actually moves
a hydraulic valve that operates the gear. Indication and anti-skid
protection is all that is lost if an electrical failure occurs after the
gear is retracted. If you have an electrical failure prior to retracting
the gear, the ground safety solenoid will not let you move the gear handle
out of the down position. It does take electrical power to override
this. The most likely use for the override would be the failure of
a squat switch followed by an engine failure after V1, but prior to gear
retraction, as leaving the gear down would result in a substantial loss
of climb performance.
Alternate extension of the gear is done by
placing the gear handle in the down position, unlatching the emergency
gear handle and rotating it 90 degrees aft, and pulling it up to discharge
the nitrogen into the down side of the forward main landing gear actuators.
The nose wheel is extended by a bunge.
If the main hydraulic system is not providing
pressure to the brakes, the brake pedals can be depressed farther by the
pilot's feet. This activates the emergency braking system.
The emergency brake system takes fluid from a standpipe in the main hydraulic
system reservoir. An electric hydraulic pump supplies brake pressure
to the aft brake calipers only. There is no anti skid protection
when using the emergency brake system. The emergency brake
system is what you use to set the parking brake prior to starting engines,
as you most likely will not have main system hydraulic pressure until one
of your engines is started.
Speedbrakes
The speedbrakes and lift dump system are hydraulically powered and electrically controlled. The speed brakes have no restrictions on their use. They may be extended with the speedbrake switch whenever you have electrical and hydraulic power available. The lift dump system consists of the speedbrakes and another panel on the inboard section of each wing. The lift dump system is allowed only on the ground during landing roll. In order to operate, both main gear squat switches must be compressed, both thrust levers must be at idle, and the lift dump switch must be placed in the lift dump position. The lift dump system deploys the speedbrakes and the inboard lift dump panels.
Thrust Reverse
The thrust reversers are hydraulically actuated and electrically controlled. The must be armed with switches beneath the thrust levers, and will then deploy when the reverse levers are moved upward and back by the pilot. Limit the use of reverse thrust to one minute. This is because a large solenoid must retract the thrust reverser locking pins. This solenoid draws lots of power and will overheat if used for more than one minute at a time. You are limited to idle power in thrust reverse below 70 knots. The thrust reversers require main system hydraulic pressure, and electrical to operate. They have their own accumulator that will deploy them once after the failure of the main hydraulic system.
HYDRAULIC SYSTEM LIMITATIONS
| MAX PRESSURE |
|
| MIN PRESSURE |
|
| MAX EMERGENCY PRESSURE |
|
| MIN EMERGENCY PRESSURE |
|
|
|
|
|
|
|
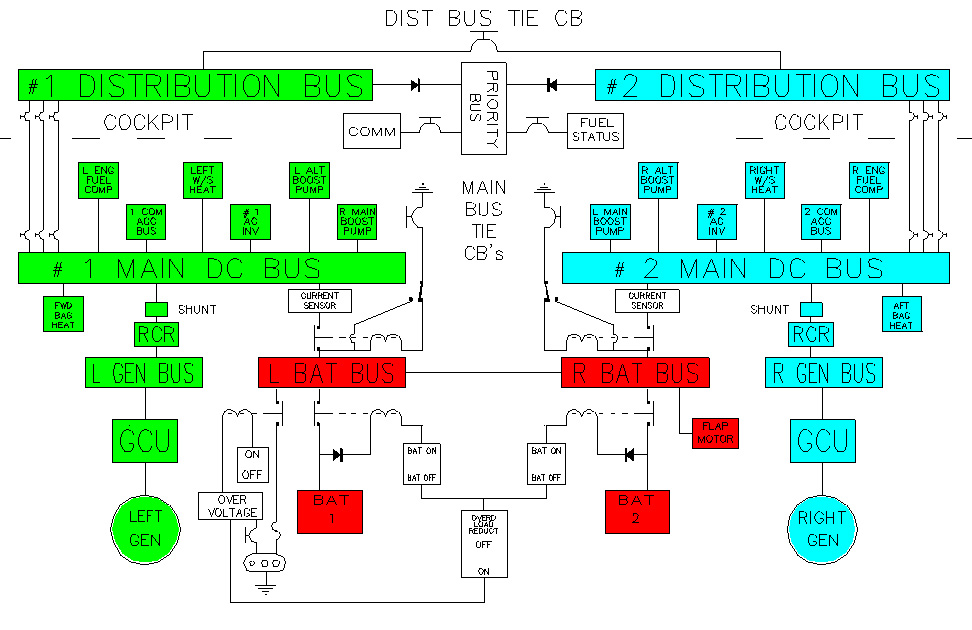
The electrical system on the Westwind Jet consists
of two batteries, two generators, and a system of electrical busses.
Engine starting may be performed using the aircraft batteries, or an external
power unit.
The starter generators on the Westwind are powered
by 28 Volt DC when an external power unit is used. During a battery
start, the batteries are connected in series, providing 48 Volt DC for
engine start. When using an external power source, start one engine only,
disconnect the external source, and start the other engine with the aircraft
batteries. During the second engine start, the operating generator
powers some of the aircraft's busses, but does not assist, or "cross generator
start" the other engine. The second engine is started with the batteries
in series, the same as the first. It does not matter which engine
you start first. The right engine is the norm, as the entry door
is on the left side.
The left and right main DC Busses are located
in the fuselage aft of the passenger compartment. Three feeder
lines connect each main bus to its respective distribution bus in the cockpit.
These feeder lines have circuit breakers on each end. A remote 50
amp CB is located adjacent to the main DC Bus, and a 35 amp CB is in the
cockpit. A distribution bus tie breaker is can connect the left and
right distribution busses if all three feeder lines are disabled on one
side. This "Distribution Bus Tie" is normally pulled. It is
"set", or pushed in only in the event one of the main busses is not powering
it's respective distribution bus.
The main busses power fuel boost pumps, inverters, windshield, and baggage heat. The distribution busses power most of the other items on the aircraft. The flap motor is powered by the battery bus, and flap control is on the #1 DC distribution bus.
The loss of one main bus will not result in the loss of both fuel boost pumps on one side. The loss of one generator will cause the load shedding of the baggage heat, the respective windshield heat, and the loss of some other minor items. The windshield heat may be reactivated by placing the battery switch to the "Override Load Reduct" position. This works ONLY if both batteries are connected. This would normally be the case unless one of the batteries overheated and was disconnected by the crew.
The generator control units on the Westwind incorporate a feature
that is common to many other aircraft. The voltage is regulated to
27 Volts DC for the first 2 minutes after the first engine is started.
This is to reduce the likelihood of a battery overheat, as it reduces the
initial charging rate. After two minutes, the voltage returns to
28.5 Volts, which can be confirmed by the increase in voltage, and the
rise in amps on the generator load meter.
| Voltage | 28.5 Volt |
| Generators | 300 Amps |
| Batteries | 24 Volt / 23 Amp Hour |
|
|
The Westwind is certified for flight into known
or forecast icing conditions. The engines are anti iced by bleed
air. The bleed air heats the nacelle lip and stators. If the
engines are equipped with the old "Bullet Nose" spinners, they are also
heated with bleed air. The P2/T2 probe is heated electrically.
The conical spinners do not require heat due to their shape. Turn
on the ignition prior to turning on engine anti ice, and leave it on until
after the engine anti ice is turned off. Do no operate the engine
anti ice on the ground for more than 10 sec if the ambient temperature
is more than 40 deg F.
The pitot / static system is electrically heated.
On the older airplanes you have an ON / OFF switch, and on the newer ones,
a switch with OVERIDE, AUTO, and OFF. Override is "ON", "AUTO" is
on whenever the nosewheel strut is extended, and "OFF" is off.
The windshields are heated electrically. The
High and Low settings are merely different temperature settings for the
thermostats that control the windshield temperature. With loss of
one generator, the respective windshield heat will be load shed, along
with the baggage heat. As long as both batteries are online, windshield
heat may be restored by placing the battery switch to the "Override Load
Reduct" position.
The forward baggage compartment is electrically
heated, unless the extended range fuel tank is installed. It is controlled
with a switch in the cockpit. The switch has three positions, OFF,
ON and Test. When you turn the baggage heat ON, the heating elements
come on only if the temperature is cold enough to require heat. If
you do not see a rise in amps on the generator when turning on the baggage
heat, select "TEST", and you will see an increase in amps, indicating operation
of the heating elements. The "TEST" position overrides the thermostat
and powers the heating elements regardless of the temperature.
The wings and tail of the Westwind are equipped
with De-Ice boots. When a quarter to a half an inch of ice has formed,
cycle the boots and remove it. Do not cycle the boots during takeoff
and landing, or when performing intentional stalls. Also, if you
want to cycle the boots once in a while to check them, do it when the wing
and tail are nice and warm as it is easier on the boots that way.
|
|
The Westwind is heated, cooled, and pressurized by engine bleed air. Bleed air is extracted from both engines. LP and HP bleed air is supplied to the "Bleed Switching Valve" or BSV. The BSV modulates or mixes the low and high pressure air in order to provide between 18.5 and 27 PSI bleed air to the environmental system.
The air travels through the "ACM" or air cycle machine. This consists of a heat exchanger, a compressor, another heat exchanger, an expansion turbine. A temperature control valve may be opened or closed to regulate the amount of air that goes through the ACM, and the amount that goes around it. Since the bleed air is hot, and it was not cooled by going through the air cycle machine, the cabin temp will increase. If for some reason the normal mode of heating & air-conditioning is not available, emergency bleed air may be provided for pressurization from the right engine's LP compressor section. This air will be hot; kind of like riding in a black station wagon in the Arizona desert in the summer. It won't kill you but it aint much fun.
The cabin temperature control valve is positioned electrically. Both manual, and automatic temp control require electrical power. Manual allows the "Cold / Hot" switch to move the valve to the desired position. "Auto" on a Westwind positions the temperature control valve in accordance with instructions from a thermostat. The auto system works about as well as Jane Fonda as a goodwill ambassador to the VFW. I suggest you use manual temp control.
The Westwind is equipped with an oxygen system. The oxygen valve must be turned on and the system checked prior to flight. If the system pressure reaches zero, it must be inspected, cleaned, and serviced by an appropriate repair facility.
GROUND PRESSURIZATION CONTROL
The "Ground Pressure Control switch causes the outflow valves
to migrate slowly to the closed position to smooth out the pressure spike
that results when the bleed air switch is placed from "Ram" to "Normal"
after liftoff. You may elect to takeoff with the bleed air on if
you are not performance limited. Bleed air on has the same effect
on the aircraft's performance as an additional 300 Lbs of weight.
If you make a bleeds off takeoff, and turn the bleeds on right after liftoff,
the transition usually not a problem.
|
|
The Westwind has two bleed air leak lights. One for the left, and one for the right. These lights tell you that hot bleed air is going somewhere that it does not belong. The first step to deal with this light is to select "Emergency" with the bleed air selector switch. This closes both bleed switching valves, and opens the emergency pressurization valve, supplying hot bleed air from the right LP compressor section to pressurize the cabin. To regulate the temperature, adjust the throttle as flight conditions permit.
If the bleed air leak light goes out, this tells you that you can control the problem with the valves. The checklist will guide you through the process of selecting left an right bleed sources to isolate the problem and possibly restore normal air conditioning with one bleed source.
If the bleed air leak light does not go out, you may have a leak that can't be controlled with the valves. This could mean that the leak is between the engine and the bleed switching valve, or that the bleed air valve will not close. In this case, you must retard the thrust levers one at a time, and possibly shut down one of the engines. This could be a real bugger if you are somewhere between the west coast and the Hawaiian Islands.
If it is necessary to operate the pressurization system in the emergency mode, you may get an "Emergency Air Temp Hi" light. If this occurs, retard the right thrust lever to the extent necessary to extinguish the light.
AIR CONDITIONING SMOKE
If you should happen to experience air conditioning smoke, you should first don your oxygen mask and smoke goggles, then, if necessary, raise the cabin altitude to the extent necessary for visibility. Deploy the passenger oxygen masks if necessary. Now you may attempt to isolate the source of the smoke as follows:
1) Bleed air switch to left engine:
Smoke stops, Leave in Left Engine.
Smoke continues, Perform step
# 2
2) Bleed air switch to right engine:
Smoke stops, Leave in right Engine.
Smoke continues, Perform step
# 3
3) Bleed air switch to Emergency:
Smoke stops, Leave in Emergency and Land.
Smoke continues, Depressurize cabin.
When
cabin differential = 0, bleed air switch to
"Ram".
The engines and the ACM are the most likely sources of air conditioning
smoke, as they contain oil. The above mentioned procedure should
prevent any additional smoke from entering the cabin.
|
|
Here are some basic flight profiles that I have used over the years. They are not the only way to fly the airplane, but have worked for me since I started giving training and checkrides in biz jets little over 20 years ago. In the event of a difference between this and the Aircraft Flight Manual, the flight manual is the document to follow.
Steep Turns
1. Enter at 250 KTS indicated AIRSPEED.
2. Bank aircraft 45 deg. As you pass 30 deg of bank, pitch
up 2 deg. Add power to maintain AIRSPEED.
3. Lead roll out by 15 deg. Passing 30 deg bank, pitch
down 2 deg to maintain altitude.
4. Maintain 250 KTS and assigned heading.
Stall - Cruise Configuration
1. Compute Vref & set AIRSPEED bugs.
2. Maintain assigned altitude and set power to Idle.
3. Trim for level flight until passing 150 KTS.
Maintain altitude with necessary back pressure.
4. At first indication of a stall, throttles
to " MAX POWER "
5. Call " MAX POWER Flaps 12 deg.
6 Reduce pitch ONLY to the extent necessary
to eliminate symptoms of the stall.
7. Reestablish assigned altitude.
8. At Vref + 15 KTS, call " Flaps Up, After Takeoff
Checklist. "
9. Maintain AIRSPEED and altitude as directed.
Stall - Takeoff Configuration
1. Compute Vref, set AIRSPEED bugs & select flaps 20.
2. Maintain assigned altitude and set power to 50% N1.
3. Trim for level flight until passing 150 KTS.
4. Establish 25 deg bank angle and maintain altitude with necessary
back pressure.
5. At first indication of a stall, advance throttles & call
" MAX POWER ".
6. Level wings and reduce pitch ONLY to the extent necessary
to eliminate symptoms of the stall.
7. Reestablish assigned altitude.
8. At Vref + 15 KTS, call " Flaps 12 deg, then Up, After Takeoff
Checklist. "
9. Maintain AIRSPEED and altitude as directed.
Stall - Landing Configuration
1. Slow to flap speed, set 60% N1 & Set bug to
Vref.
2. Maintain assigned heading & altitude.
3. Below 250 KTS, " Flaps 12 deg".
4. Below 225 KTS, " Flaps 20 deg".
5. Below 180 KTS, " Gear Down Landing Check ".
6. Below 180 KTS, " Full flaps. " trim to Vref. Establish
a 400-700 feet/min sink rate at Vref.
7. Level off at designated altitude W I T H
O U T increase in power
8. Maintain altitude until first indication
of a stall.
9. Apply MAX power lower nose only as much as required
to eliminate the stall.
At Vref minus 10 KTS
M I N I M U M speed, call for " Flaps 20 deg", and increase the
pitch attitude to 10 deg nose
up at about 1 deg / sec.
10. When VSI & Altimeter indicate positive rate of climb
call " Positive rate, Gear Up ".
11. Establish 7.5 deg nose up attitude.
12. At Vref + 20 KTS, Call " Flaps 12 deg, then Up, After Takeoff
Checklist ".
13. Return to entry heading and altitude or as directed.
ILS Approach - Two Engines
1. Intercept LOC at 140-160 KTS and Flaps 20 deg.
2. One dot prior to intercepting Glide Slope, call
" Gear Down Landing Check ".
3. When ON the glidepath, call " Full Flaps ".
4. Establish Vref to Vref + 5 KTS & track LOC
&
GS until Minimums.
ILS Approach - One Engine
1. Intercept LOC at 140-160 KTS and Flaps 12 deg.
2. One dot prior to intercepting Glide Slope, call " Gear
Down Landing Check ".
3. When ON the glidepath, call "Flaps 20 deg".
4. Establish Vref + 15 KTS & track LOC & GS
5. At 100-150 Ft AGL, Full flaps, power idle & land.
Non Precision Approach - One or Two Engines
1. Intercept Final Approach Course at 140 KTS and
Flaps 20 deg.
2. Crossing Final Approach Fix, call " Gear Down
Landing Check ".
3. Descend to and maintain MDA until Field in Sight
or MAP is initiated. ( As Appropriate ).
4. If Landing is to be made, call " Full Flaps "
when intercepting a glidepath appropriate for a
normal landing. For one
engine INOP, Vref + 15 KTS until 100 feet AGL, then " Full
Flaps" so as to descend thru 50
ft AGL at Vref as in a normal landing.
No Flap Approach
1. Vref + 25 KTS until established on Final Approach.
2. Vref + 15 KTS on final.
3. Approach angle NORMAL. A flat approach will usually
result in a longer landing roll.
Go Around or Missed Approach
1. "Max Power", Rotate to 10 deg nose up, " Flaps 20 deg".
2. Positive Rate of Climb, " Gear Up ", Vref + 15, " Flaps up,
After Takeoff Checklist ".
3. Climb at 200 KTS.
4. Engine Failure or Fire Checklist if Appropriate.
Takeoff
1. Set V2 on Capt. Airspeed & V1 on Co-Pilots Airspeed.
2. At 80 kts, left hand moves from tiller to Yoke.
3. At V1, right hand moves from throttles to Yoke.
4. Vr, Rotate to 15 deg ( 2 eng ) 12 deg ( 1 eng ).
5. Climb at 15 deg pitch, ( 2 eng ) or V 2 ( 1 eng ).
6. At 400 ft & V2+30 KTS, "Flaps Up After T.O. Check ".
7. Engine Failure or Fire Checklist if Appropriate.
8. Climb 200 KTS to 3000 AGL then 250 Kts.
Rejected Takeoff
1. Proceed as in normal takeoff until malfunction dictates that
the takeoff be rejected.
2. Capt. calls "Abort" (Co-Pilot may call Abort if Capt elects
to delegate that authority).
3. Thrust levers to idle
4. Speedbrakes extend.
5. Wheel brakes as necessary.
6. Thrust Reverse deploy.
7. If another takeoff is contemplated consider brake energy &
appropriate turnaround time.
Emergency Descent
1. Oxygen masks on within 5 sec of cabin pressure
loss.
2. Check passenger oxygen masks deployed.
3. Select Oxygen mask microphone.
4. Ignition ON.
5. Thrust levers to idle.
6. Spoilers Extend.
7. Auto Pilot OFF.
8. Initiate 45 deg bank if desired.
9. Vmo/Mmo minus 10 kts to 14,000 or MEA as
required.
10. Clean up & proceed to nearest suitable airport if appropriate.
Back to: Airplane Driver's Network