 |
|
|
|
|
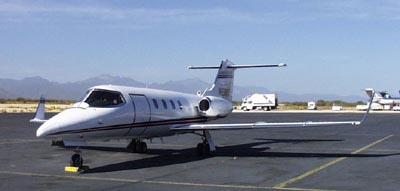
H o t r o d o f t h e F l e e t
|
|
|
|
|
|
Weights
| Ramp |
|
| Takeoff |
|
| Landing |
|
| Zero Fuel |
|
| Basic Operating Weight |
|
Speeds
| Vmo / Mmo
SL to 14,000 msl Above 14,000 msl Auto Pilot & Mach Trim Inop Stick Puller Inop Boundry Layer Energizer Missing |
306 / 0.82 Mach 359 / 0.82 Mach 0.74 Mach 0.74 Mach 0.78 Mach |
| Vmin / Above FL 450 |
|
| Vlo |
|
| Vle |
|
| Vfe
08 Deg 20 Deg 40 Deg |
190 kts 150 kts |
| Vmca |
|
| Vmcg |
|
| Nosewheel Steering |
|
| Max Demonstrated Crosswind Component |
|
| Nosewheel Steering / more than one of RH 3
Anti Skid Generators inop |
|
| Max Altitude
Cruise Takeoff & Landing |
10,000 ft |
| Max Tailwind Component T.O. & Land |
|
| Demonstrated Crosswind |
|
| Max Runway Clutter |
|
| Pressurization Limits |
|
| Minimum Fuel / Takeoff |
|
| Temperature Limits |
|
| Load Factor
Flaps Up Flaps Extended |
+ 2.0 G to - 0.0 G |
| Yaw Damper |
|
| Max Altitude / Auto Pilot & Yaw Damper Inop |
|
| Stall Warnings |
|
| Generator Amps
Below 60 deg F Above FL 450 |
400 amps 200 amps |
|
|
The Lear 28 fuel system differs from the other 20
series in that it has no tip tanks, and a much larger fuselage tank.
The 28 also has 3 transfer mechanisms, and 4 options as to how to transfer
the fuselage fuel to the wings. As you can see, the Lear 28 does
not have as much fuel as the other 20 Series airplanes, except for the
24 E, therefore, don't expect the same range. Figure on the classic
2000 lbs of fuel the first hour, then 1300 lbs the second hour. You
then have about 1300 lbs of fuel left. If you intend to land
with any reasonable reserve, figure on 2 hours 15 minutes VFR, and 1 hour
30 minutes IFR. If you stretch it farther than this and sooner or
later you will wish you could find a tanker!
The picture at the beginning of this study guide was taken at Cabo San
Lucas in Baja Mexico. The last leg was Burbank California to Cabo,
and that was about all the range we could muster without being stupid about
it.
 |
|
|
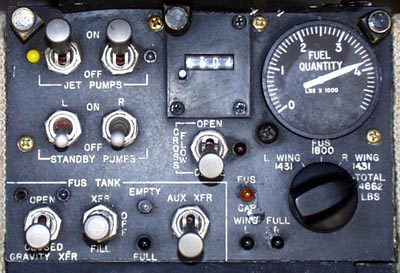
The fuel Transfer Methods
|
|
Fuselage Fuel gravity flows into wings slowly. The last 194 lbs will not gravity transfer. |
|
|
Left Fuselage Tank pump transfers fuel to both wings. Crossflow Valve opens automatically. |
|
|
Right Fuselage Tank pump transfers fuel to both wings. Crossflow Valve opens automatically. |
|
|
Both Fuselage Tank Pumps operate, transferring fuel to each wing. Crossflow valve is closed |
Note: Remember to transfer
the fuselage fuel early. You can have major center of gravity problems
if you don't. At low altitudes, you may not be able to transfer fuel
as fast as the engines will burn it out of the wings. If you are
looking for a way to appear very stupid, and possibly run out of gas with
fuel aboard, this is a good place to start! The Xfer / Fill Switch
( 2nd from the lower left in the photo ) can easily be placed in the "Fill"
position accidentally due to it's placement and poor design. Be sure and
verify that it is actually in the "Off" position, as opposed to selecting
"Fill" by mistake. If you do screw this one up, your first sign may
be the low fuel lights. If this does happen, immediately select both
normal and aux transfer. This is the only way that the system has
any chance of getting fuel to the wings as fast as the engines on this
airplane will consume it at low altitude. If anything is going to
bite you in the ass on this airplane, it will be the fuel system.
|
|
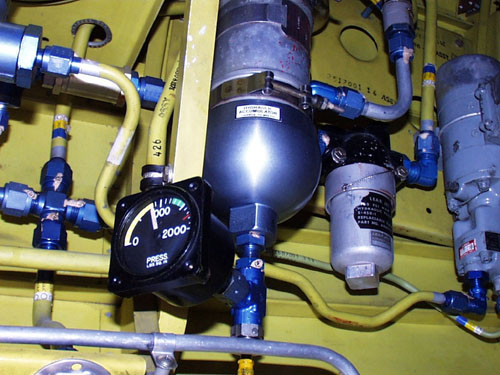
The Lear 28 hydraulic system is the same as on the
other 20 series Lear Jets. The fluid is 5606, 1.9 gallons in the
reservoir, and 6.6 gallons in the entire system. You have 2 engine
driven pumps, one electric hydraulic pump, and an emergency air bottle.
The Gear, inboard main gear doors, flaps, spoilers and brakes are powered
by the hydraulic system. The emergency air will lower the landing
gear, and provide 10 brake applications. Anti skid and differential
braking are not available when emergency air is used.
 |
|
|
The engine driven hydraulic pumps can not use the
last 0.4 gallons of fluid in the reservoir. The electric hydraulic
pump can use all the fluid. The last 0.4 gallons should extend the
gear, flaps and give you 10 brake applications through the use of the electric
hydraulic pump. This pump has a duty cycle limit of 3 minutes on,
and 20 minutes off. Leave it off when you are not operating or about
to operate something with it. During a normal flight, you will use
it to set the parking brake, then leave it off for the rest of the flight.
 |
|
|
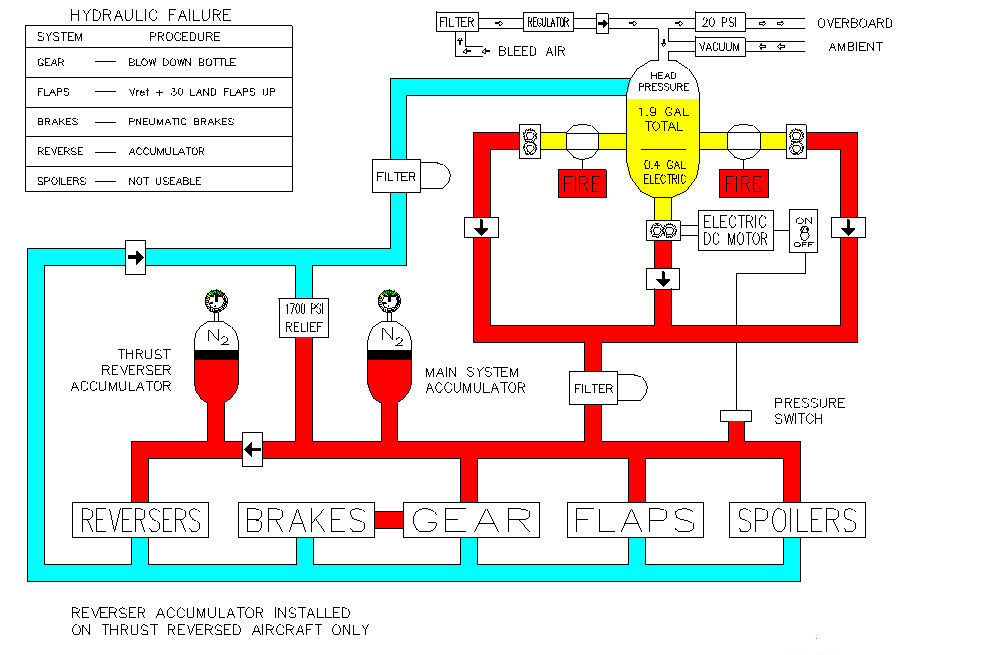
Hydraulic Failure
| Landing Gear |
|
| Flaps |
Add 30% to Landing Distance *** |
| Spoilers |
Later model Lears have a check valve preventing spoiler use with Aux Hyd Pump |
| Brakes |
No Anti Skid / No Differential Braking |
*** Note: The 30% landing distance adjustment addresses flaps
only. The lack of spoilers and anti skid in addition to the flaps
up landing will result in a landing distance of between 1.7 and 2.0 times
the normal landing distance.
|
|
The Lear 28 has a basic late model Lear 25 electrical
system. You have 2 batteries, two Starter / Generators, two main
electrical busses, two essential busses, and a bunch of circuit breakers
and current limiters to tie them all together. On the Lear 28, you
must pull both the main bus tie and essential bus tie circuit breakers
to perform a valid current limiter check. Current limiters are not
generally as much of a problem on the 20 series airplanes, as the generators
will usually not produce enough current to blow the current limiters at
idle rpm. You can, however, blow one if you start with the freon
system or aux heat on. Those systems will turn off during engine
cranking, but come back on when you put the first generator online.
This is when the current limiter blows. Cranking current goes through
the start relay, not the current limiter. The current limiter ( 275
amp Fuse ) blows if the batteries are drawing more than the current limiter
can handle while charging the batteries after the first engine start.
The 20 series Lear Jet electrical systems are highly reliable. Don't
expect a whole lot of trouble.
 |
|
|
|
|
The Lear 28 has a simple environmental system.
Bleed air from the 8th stage of the engine compressors is routed through
a heat exchanger and a flow control valve into the cabin. Temperature
is regulated by a valve that controls how much ambient air is allowed to
flow across the heat exchanger. The temperature control valve is
28 volt DC electric. It operates in Automatic or manual modes, both
being electric.
If the cabin altitude exceeds 9,500 feet MSL, the
emergency bleed valves open, bypassing the flow control valve and heat
exchanger, routing raw bleed air into the cabin.
Pressurization is controlled in the automatic mode,
or with the manual system, or "Cherry Picker". The automatic system
requires DC electrical power, and the manual requires a light touch from
the operator, as it is very sensitive.
Above 11,000 foot cabin altitude, the outflow valve
should close because of the cabin altitude limiter. The system vents
cabin pressure to the normal and safety outflow valves, causing them to
close.
 |
|
|
|
|
The Lear 28 is powered by the CJ-610-8a engine.
Sea Level thrust is 2,950 lbs. This engine design is almost older
than Moses, and is as technologically mature as an engine is going to get.
Kind of like the 327 Chevy, time tested. One thing to watch real
close! Don't shut off the engine anti ice without having the ignition
on, and the rpm back to 95% or less. If you do, the engine may flame
out. This problem usually happens above 15,000 feet. Nobody
from Lear or G.E. admits it, but the engine may flame out due to a pressure
spike when the anti ice valve closes. If you use the above procedure,
you should have no problem. Obey the 0.65 Mach Minimum
Speed above FL 450. Flameout may occur if you don't.
|
|
|
|
Oil Press | Oil Temp |
| Start |
|
854 C / 5 Sec 782 C / 10 Sec |
|
- 54 C / Type 1 |
| Takeoff |
|
|
|
|
| Max Continuous |
|
|
|
|
| Climb |
|
|
|
Note: The 61 psi to 70 psi oil pressure limit is only for 12 minutes
above 95 % rpm. If you start both engines at the ramp, the oil should
be warm enough. Idle for 3 minutes if the temp is below - 25 deg
C. This also warms the hydraulic system.
|
|
Here are some basic flight profiles that I have used over the years. They are not the only way to fly the airplane, but have worked for me since I started giving training and checkrides in the Lear a little over 20 years ago. In the event of a difference between this and the Aircraft Flight Manual, the flight manual is the document to follow.
Steep Turns
1. Enter at 250 KTS indicated AIRSPEED.
2. Bank aircraft 45 deg. As you pass 30 deg of bank, pitch
up 2 deg. Add power to maintain AIRSPEED.
3. Lead roll out by 15 deg. Passing 30 deg bank, pitch
down 2 deg to maintain altitude.
4. Maintain 250 KTS and assigned heading.
Stall - Cruise Configuration
1. Compute Vref & set AIRSPEED bugs.
2. Maintain assigned altitude and set power to Idle.
3. Trim for level flight until passing 150 KTS.
Maintain altitude with necessary back pressure.
4. At stick shaker or stall warning lights,
throttles to " MAX POWER "
5. Call " MAX POWER Flaps Approach.
6 Reduce pitch ONLY to the extent necessary
to eliminate symptoms of the stall.
7. Reestablish assigned altitude.
8. At Vref + 30 KTS, call " Flaps Up, After Takeoff
Checklist. "
9. Maintain AIRSPEED and altitude as directed.
Stall - Takeoff Configuration
1. Compute Vref, set AIRSPEED bugs & select flaps 20.
2. Maintain assigned altitude and set power to 65% N1.
3. Trim for level flight until passing 150 KTS.
4. Maintain altitude with necessary back pressure.
5. At stick shaker or stall lights, advance throttles & call
" MAX POWER ".
6. Reduce pitch ONLY to the extent necessary to eliminate symptoms
of the stall.
7. Reestablish assigned altitude.
8. At Vref + 30 KTS, call " Flaps Up, After Takeoff Checklist.
"
9. Maintain AIRSPEED and altitude as directed.
Stall - Landing Configuration
1. Slow to flap speed, set 80% N1 & Set bug to
Vref.
2. Maintain assigned heading & altitude.
3. Below 200 KTS, " Flaps 8 deg".
4. Below 190 KTS, " Flaps 20 deg".
5. Below 200 KTS, " Gear Down Landing Check ".
6. Below 150 KTS, " Full flaps. " trim to Vref. Establish
a 400-700 feet/min sink rate at Vref.
7. Level off at designated altitude W I T H
O U T increase in power
8. Maintain altitude until first indication
of a stall. (Shaker or stall lights)
9. Apply MAX power lower nose only as much as required
to eliminate the stall warning.
At Vref minus 10 KTS
M I N I M U M speed, call for " Flaps 20 deg", and increase the
pitch attitude to 10 deg
nose up at about 1 deg / sec.
10. When VSI & Altimeter indicate positive rate of climb
call " Positive rate, Gear Up ".
11. Establish 7.5 deg nose up attitude.
12. At Vref + 30 KTS, Call " Flaps Up, After Takeoff Checklist
".
13. Return to entry heading and altitude or as directed.
ILS Approach - Two Engines
1. Intercept LOC at 140-160 KTS and Flaps 20 deg.
2. One dot prior to intercepting Glide Slope, call
" Gear Down Landing Check ".
3. When ON the glidepath, call " Full Flaps ".
4. Establish Vref to Vref + 5 KTS & track LOC
& GS until Minimums. Land or Missed Approach as appropriate.
ILS Approach - One Engine
1. Intercept LOC at 140-160 KTS and Flaps 8 deg.
2. One dot prior to intercepting Glide Slope, call " Gear
Down Landing Check ".
3. When ON the glidepath, call "Flaps 20 deg".
4. Establish Vref + 20 KTS & track LOC & GS
5. At 100-150 Ft AGL, Full flaps, power idle & land.
Non Precision Approach - One or Two Engines
1. Intercept Final Approach Course at 140 KTS and
Flaps 20 deg.
2. Crossing Final Approach Fix, call " Gear Down
Landing Check ".
3. Descend to and maintain MDA until Field in Sight
or MAP is initiated. ( As Appropriate ).
4. If Landing is to be made, call " Full Flaps "
when intercepting a glidepath appropriate for a
normal landing. For one
engine INOP, Vref + 20 KTS until 100 feet AGL, then " Full
Flaps" so as to descend thru 50
ft AGL at Vref as in a normal landing.
No Flap Approach
1. Vref + 30 KTS until established on Final Approach.
2. Vref + 20 KTS on final.
3. Approach angle NORMAL. A flat approach will usually
result in a longer landing roll.
Go Around or Missed Approach
1. "Max Power", Rotate to 10 deg, " Flaps 20 deg".
2. Positive Rate of Climb, " Gear Up ", Vref + 30, " Flaps up,
After Takeoff Checklist ".
3. Climb at 200 KTS.
4. Engine Failure or Fire Checklist if Appropriate.
Takeoff
1. Set V2 on Capt. Airspeed & V1 on Co-Pilots Airspeed.
2. At V 1, BOTH hands on Yoke.
3. Vr, Rotate to 15 deg ( 2 eng ) 12 deg ( 1 eng ).
4. Climb at 15 deg pitch, ( 2 eng ) or V 2 ( 1 eng ).
5. At 400 ft & V2+30 KTS, "Flaps Up After T.O. Check ".
6. Engine Failure or Fire Checklist if Appropriate.
7. Climb 200 KTS to 3000 AGL then 250 Kts.
Rejected Takeoff
1. Proceed as in normal takeoff until malfunction dictates that
the takeoff be rejected.
2. Capt. calls "Abort" (Co-Pilot may call Abort if Capt elects
to delegate that authority).
3. Thrust levers to idle
4. Spoilers extend.
5. Wheel brakes as necessary.
6. Thrust Reverse OR Dragchute deploy. (Never Both!)
7. If another takeoff is contemplated consider brake energy &
appropriate turnaround time.
Emergency Descent
1. Oxygen masks on within 5 sec of cabin pressure
loss.
2. Check passenger oxygen masks deployed.
3. Select Oxygen mask microphone.
4. Ignition ON.
5. Thrust levers to idle.
6. Spoilers and Landing Gear, Extend.
7. Auto Pilot OFF.
8. Initiate 45 deg bank if desired.
9. Vmo/Mmo minus 10 kts to 14,000 or MEA as
required.
10. Clean up & proceed to nearest suitable airport if appropriate.
Condition of aircraft or
reduced range due to low
altitude may make flight to original destination unwise.