 |
|
|
|
CE-500 / 501 / 550 /551 |
 |
|
|
 |
|
|
 |
|
|
 |
|
|
LIMITING SPEEDS
| Mmo | .705 Mach |
| Vmo | 262 kts Below 14,000' MSL
or with 9500# ZFW
277 kts Above 14,000" MSL and with 8400# ZFW |
| Va | 148 at 7500# to 183 at 11,850# (See AFM.) |
| Vfe | 202 kts T.O. and Approach 15 degrees
176 kts Land 40 degrees |
| Vle | 176 kts |
| Vlo | 176 kts |
| Vsb | Vmo/Mmo (No limitations on speedbrakes.) |
| Vmca | Below stall speed for all weights |
| Vmcg | 55 kts CE-500
59 kts CE-501 62 kts CE-550/551 |
| Max Tire Speed | 165 kts |
OPERATIONAL LIMITS
Maximum Altitude:
| CE-500 |
|
| CE-500 with High Altitude Kit |
|
| CE-501 |
|
| CE-550/551 |
|
Minimum Crew: CE-500, CE-501, and CE-550:
Pilot with CE-500 Type Rating, instrument rating for IFR flight.
Co-Pilot with Multiengine Rating, systems knowledge, FAR 61.55 requirements
and Instrument Rating for IFR.
CE-501SP, CE-551: Pilot CE-500 Type Rating, instrument Rating
for IFR flight.
TAKEOFF AND LANDING LIMITS
| Maximum Altitude |
|
| Min and Max Temperatures |
|
| Maximum demonstrated crosswind component |
|
| Maximum Tailwind Component |
|
| Vertical Navigation off below 500 AGL |
|
| Autopilot off for takeoff and landing |
|
TIRE PRESSURE
|
|
|
|
|
|
|
|
|
|
|
|
WEIGHT LIMITS
|
|
|
|
|
|
|
|
|
|
|
|
|
|
|
|
|
|
|
|
|
|
|
|
|
|
|
|
|
|
|
|
|
|
|
|
Note: These weights can be further restricted by runway length, slope,
surface condition, temperature, and pressure altitude. See flight
manual performance data. Compliance with FAR 25 performance limits is mandatory.
|
|
The 500 series Citations are all equipped with some version of the Pratt
& Whitney JT-15D engine. The Citation 500 and 501 are powered
by the -1, -1A, or -1B version. The Citation 550 and 551 are powered
by the JT-15D-4. The differences between the -1 engines are minor.
The -4, however, has an axial flow compressor aft of the Fan and prior
to the turbine. This provides more air to the engine core at high
altitudes. This increases thrust and reduces the bypass ratio, resulting
in higher cruise speeds and improved takeoff performance.
|
|
|
|
|
|
|
|
|
|
|
|
|
|
|
|
|
|
|
|
|
|
|
|
|
|
|
|
|
|
|
|
|
|
|
|
|
|
|
|
|
|
|
|
|
|
|
|
|
|
|
|
|
|
|
|
|
|
|
|
|
|
|
|
|
Note: JT15D-1A & 1B Engines develop more thrust at cruise altitude than JT15D-1 due to higher N1 RPM limit; 99% for -1, 102.1% for -1A, & 103.4% for -1B. Sea level thrust remains the same.
JT 15D-1/ 1a/ 1b Engines
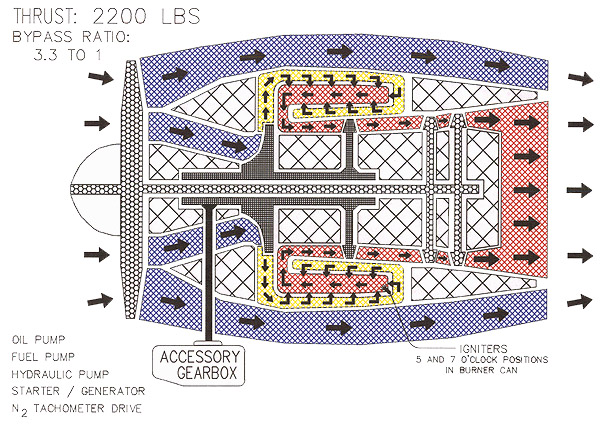
JT 15D-4 Engine
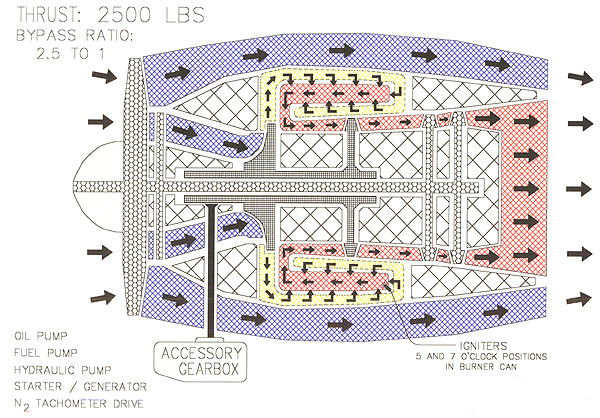
The -4 engine has an axial compressor just aft of
the fan. There are other minor design differences. The important
thing here is that the engine core gets more air, and that means more thrust,
and that's what engines are all about in the first place.
CAUTION: The JT-15D-4 engine requires much more frequent monitoring
of N1 rpm during climb than any of the JT-15D-1 engines, as they will increase
N1 rpm with a gain of altitude if the thrust levers are not retarded.
Overspeed WILL result if N1 is not checked every five thousand feet during
climb.
|
|
FUEL SYSTEM
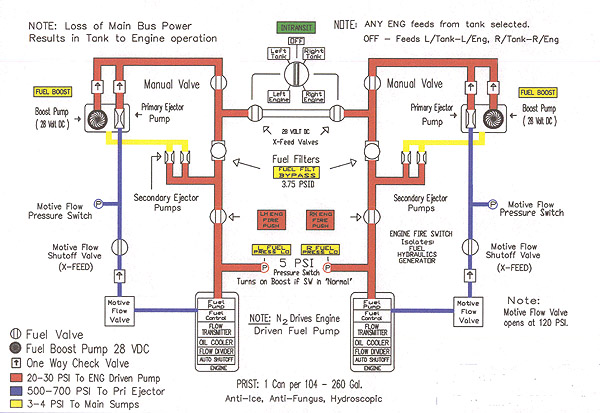
The fuel system on the 500 series Citations is a simple one by most standards. The Citation has two "Wet Wing" type fuel tanks, one left, and one right. During normal operation each engine is supplied with fuel from it's own tank. The left tank feeds the left engine, and the right tank feeds the right engine. The left and right fuel tanks are mirror images of each other. They are connected by two crossfeed valves and a crossfeed manifold allowing one or both engines to draw fuel only from the tank desired when crossfeed is selected. These valves are DC powered and will remain in their last position if Main DC Bus power is lost. Each tank has one 28 Volt DC electrically driven fuel boost pump, a primary ejector pump, and two secondary ejector pumps.
The electric fuel pumps run during engine start and crossfeed regardless of their switch position. If the boost pump switches are in "NORMAL" and the fuel pressure drops below 5 PSI for any reason, the fuel boost pumps will come on.
The primary ejector pumps come on during the latter stage of engine start, as soon as there is enough pressure from the "engine driven fuel pump" to open the motive flow valves. Pressure from the engine driven fuel pump is what drives the primary ejector pump. The primary ejector pumps will run from the latter part of the start cycle until the respective engine is shut down OR until the OPPOSITE fuel tank is selected with the crossfeed switch. In this case the "Motive Flow SHUTOFF Valve" will stop the flow of fuel from the engine driven fuel pump to the primary ejector pump in the tank NOT selected. This results in the Electric Fuel pump and the Primary Ejector pump running on the selected side, the crossfeed valves being open, and NO electric or primary ejector pump operating on the side not selected. In this case, the fuel for ANY operating engine will be drawn only from the fuel tank selected with the crossfeed switch.
The secondary ejector pumps operate any time that there is fuel pressure in the system. They transfer fuel to the main fuel sump from other sumps in each tank. They have no moving parts except the fuel itself, and can not be controlled by the pilot.
During engine start, the electric fuel boost pump comes on when the start button is depressed. If the thrust lever is moved from "Cutoff" to the idle position and the boost pump is in the "Normal position, the pump will come on due to the 5 PSI pressure switch regardless of whether the start button is depressed or not. The fuel flows from the pump thru a one way check valve, thru the manual fuel shutoff valve, the fuel filter, and to the engine driven fuel pump. A small amount of fuel flows thru the secondary ejector pumps back into the wing. As the engine gains RPM after light off, the fuel pressure generated by the "Engine Driven Fuel Pump" becomes high enough to open the "Motive Flow Valve". This allows the engine driven fuel pump to power the primary ejector pump with high pressure fuel and still have enough fuel pumping capacity to meet all the fuel pressure needs of the fuel control unit. The electric fuel pump will automatically shut off at this time unless it is selected to the "ON" position.
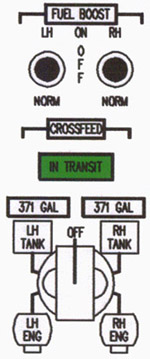
Lets assume that we wish to use fuel from only the left tank. Select "LH Tank" with the crossfeed selector. This will do the following:
1. The left electric
fuel pump will come ON and
the right electric fuel pump will turn off.
2. The left primary ejector pump will remain ON.
3. The crossfeed valves will open.
4. In 3 sec the RH motive flow shutoff valve will close, disabling the RH primary ejector pump.
This results in 2 fuel pumps operating in the left tank and no fuel pumps operating in the right tank. The left tank will then supply fuel to any engines that are running. A small amount of fuel (very small) will transfer from the left to the right tank by going thru the crossfeed valves, the right fuel filter, and into the right tank via the right secondary ejector pumps. In flight this transfer is not significant. It may be used on the ground, however, to equalize the fuel in the tanks prior to start. This should be done only with an external power source, as the battery may become discharged.
To stop the crossfeed, turn the crossfeed switch to the off, (vertical) position. This will do the following:
1. Remove power from the motive flow shutoff valve, allowing it to open.
2. Close the crossfeed valves.
3. Turn off the boost pump that was turned on when we first selected crossfeed.
The loss of Main DC Buss power during normal (tank to engine) fuel system operation will have no effect on fuel system operation. Why? Because the motive flow shutoff valves fail open, causing the primary ejector pumps to turn on, or in this case remain on. The crossfeed valves are motor driven, and will fail in their last position, which in this case is closed. So as you see, nothing changes. Except that the two fuel pressure low lights will be inoperative. The electric fuel pumps will not be available, and crossfeed is not possible because the crossfeed valves are closed, and may not be opened without Main DC Bus power. Loss of Main DC Bus power during crossfeed results in tank to engine (left tank feeds left engine, right tank feeds right engine) operation. This is because:
1. The motive flow shutoff valves fail open, causing the primary
ejector
pump that was disabled to come on again.
2. The fuel boost pump that came on when crossfeed was started
will fail
due to the loss of Main DC Bus Power.
3. The crossfeed valves will remain open, because they were open
at the
time of the failure.
This terminates the crossfeed, as each tank's primary ejector pump is operating. Some tank to tank transfer may occur Because the fuel tanks are manifolded together. The crossfeed valves will have failed in their last position, OPEN.
Remember: Loss of main DC bus power results in each engine drawing
fuel from its own tank. If crossfeed was selected at the time of
the failure, the crossfeed manifold will remain open, allowing some fuel
balancing due to the most reliable force known to man. GRAVITY!
If one engine is shut down, close the crosfeed valves prior to loss of
Main DC Bus power to prevent unwanted fuel transfer from the primary ejector
pump, through the crossfeed valves, opposite fuel filter, through
the secondary ejector pumps and into the opposite wing. See fuel
system drawing below.
 |
Note: Max 3500 gallons of Avgas
per engine per overhaul.
If Avgas exceeds 50% by volume; 1) Boost
Pumps ON,
2) Logbook entry, 3) Max Altitude 25,000'
except
on JT15D-4, Max altitude is 22,000'.
Note: All fuels must contain
Prist. One 20 ounce can for
each 104 to 260 gallons. (Jet
B / Jp-4 and
Phillips 66 Jet A / Jp-5 already contain
Prist!)
Hint: To convert pounds to gallons, (Jet fuel only), take the number of pounds you wish to add, divide by 10, then multiply by 1.5 and you will be close enough.
Example: 1000 Pounds of fuel.
1000 / 10 = 100, 100 X 1.5 = 150
Answer: 150 Gallons
This may save you from having to shine your landing lights on your solar powered calculator on some dark and stormy night. The sad fact is that normal people think of fuel in gallons, not pounds. If you don't believe me, just try placing your next fuel order in pounds. The FBO probably won't have a scale to weigh your fuel for you.
Fuel Tank Capacity
| CE-500 |
|
536 Gal | 3618 lbs Total |
| CE-500 |
|
544 Gal | 3672 lbs Total |
| CE-501 |
|
564 Gal | 3809 lbs Total |
| CE-550 |
|
742 Gal | 5008 lbs Total |
APPROVED FUELS
|
|
|
|
|
|
|
|
|
|
|
|
|
|
|
|
* The minimum fuel temperature is not always the freezing temp of the particular fuel, Viscosity can sometimes be the limiting factor. The fuel may be too thick at temperatures below the limit. The military uses Jp-4, as it is suitable for a wider range of temperatures than Jet A / Jp-5 or kersosene.
Note: Max 3500 gallons of Avgas per engine per overhaul.
If Avgas exceeds 50% by volume; 1) Boost Pumps ON, 2) logbook entry, 3)
Max Altitude 25,000' except on JT15D-4, Max altitude is 22,000'.
Note: All fuels must contain Prist. One 20 ounce can for each 104
to 260 gallons. (Jet B / Jp-4 and Phillips 66 Jet A / Jp-5 already
contain Prist!)
|
|
"DC" Electrical
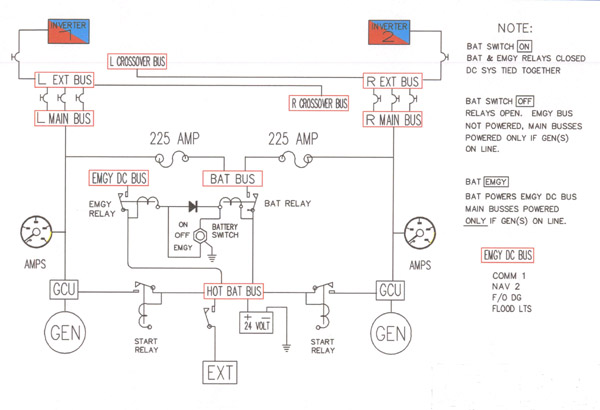
The Citation DC electrical system is simple as systems go. It consists of: One battery, Two starter generators, several busses, some relays, current limiters, quite a few circuit breakers, and a battery switch. The battery switch has three positions: OFF, ON & EMERGENCY. By selecting the proper position for this and the generator switches, we can handle all normal and emergency operations that require changes in the DC electric system configuration.
Battery Switch Positions
OFF - Battery relay and emergency relay are open. Emergency bus is NOT powered. Bat & Main busses are not powered unless one or both generators are on line.
ON - Battery and Emergency relays are closed. Entire DC electrical system operates in parallel. Battery is being charged if one or both generators are on and operating. Emergency DC Bus is powered by the generators through the GCU -> 225A Current limiter -> Battery Bus -> Battery Relay -> Hot Battery Bus -> Emergency Relay to the Emergency DC Bus. (See the DC schematic). With the Battery switch ON, all DC busses on the aircraft are powered if the battery is installed and is not discharged or disconnected.
EMGY
Emergency relay is closed, powering
the Emergency DC Bus with battery power through the Hot Battery Bus.
The Battery Relay is open, preventing the battery from powering the battery
bus or any of the main DC busses. This also prevents the generator(s)
from charging the battery.
Here are some situations requiring the use of the features we have previously covered with respect to the Citation electrical system:
Normal Operation:
Battery switch ON, before engine start, all DC busses are powered
by battery or GPU. After engine start, all busses are powered by
the generator(s), and the battery is recharged.
Battery Overheat
Battery switch EMGY, opens battery relay, prevents battery charging.
Main DC busses powered by generator(s), emergency DC Buss powered by battery.
( 2 Hours Max. ) Verify that battery relay opened by checking battery and
generator voltage. If the battery voltage drops below the generator voltage
after emergency is selected, battery relay did open, and charging was halted.
Otherwise, turn battery back on and take generators off line to prevent
further overheat.
Both Gen's Fail
Battery switch EMGY, removes power from main DC busses, powers
emergency DC bus with battery. This will load shed all electrical
items on the aircraft except items powered by the Emergency DC Bus: Comm
1, Nav 2, C0-Pilot's HSI, and the cockpit flood lights, and
the passenger advisory light which is powered by the "Hot Battery Bus.
Elect Fire/Smoke
Select battery switch to EMGY and both gen's Off. This
will download the system to the 4 items on the emergency DC bus. If the
smoke or fire does not stop, select generators on, and battery switch OFF.
This removes power from the emergency bus items, and restores power to
the remainder of the electrical system. If this does not remedy the
situation, LAND ASAP!
If you experience loss of all main DC bus power for any reason, remember the following:
1. Alternate gear extension procedure will be required.
Hydraulic system uses electric control.
2. NO electrical gear indication will be available.
3. Engine stator and nacelle heat are on above 60% N2. Fan's nose
cone
and T2 probe are heated by bleed air
whenever the engine is running.
4. Electrical wing heat, de-ice boots, pitot/static and AOA heat will be inop.
5. Windshield Heat will be on unless you turn it off with the
manual valves
located on the co-pilot's panel.
Windshield O'Heat warning will be inop.
6. Crossfeed will not be possible. If crossfeed was selected, the boost pump in the tank selected will fail, the crossfeed valves will remain open, and the motive flow shut-off valves will fail open, energizing the primary ejector pump in the fuel tank that was previously disabled. The result of this will be tank to engine operation, with an open crossfeed manifold connecting the two fuel tanks.
7. The AC system will be inop as it receives power from the DC system.
8. The hydraulic system will be inop, as the gear, speedbrakes,
and main
bypass valve are electrically
controlled.
9. Flaps will remain in their last position.
10. Any optional Anti-Skid and power brakes are inop.
11. Pressurization source will be both engines as the left and right bleed valves fail open, and both the emergency and ground air valves fail closed. This is the same as if "Both" were selected. You might say that the environmental system fails to "Both". Cabin temperature will be determined by the temperature control valve position at the time of the failure, and by engine power. (Bleed air temp.)
These things may require some thought as to how one wishes to conduct
the remainder of a flight. A normal instrument approach is still
possible using the co-pilot's instruments. Remember, the co-pilot's attitude
indicator is air driven.
Landing distance will be increased 30% if the flaps were up at the
time of failure. Plan ahead.
Note: If battery voltage is high enough (22 volts) and you are close
enough to the airport, you may elect to turn the battery switch on, and
make a normal landing.
 |
|
|
1. Com 1 (With headset: audio
amp unpowered)
2. Nav 2
3. Co-Pilots PN 101
4. Cockpit Flood Lights
Note: On some of the late model CE-550 and later airplanes, the
Co-Pilot's pitot heat is on the emergency DC Bus.
Starter Limits. Three starts in 30 minutes.
AC Electrical
 |
|
|
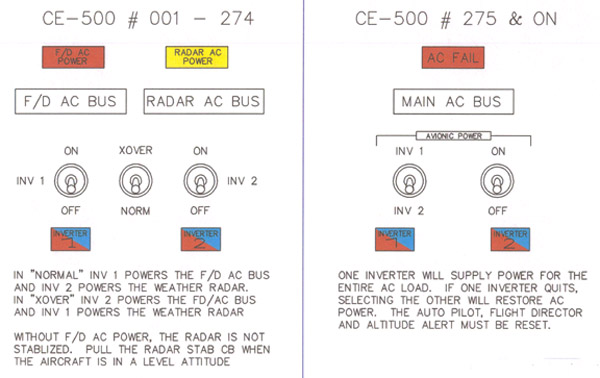
There are two types of "AC" electrical systems found on the Citation. The first (500-274 and earlier) are sometimes referred to as the "RCA" airplanes. All 500 series Citations have two inverters. The inverter system installed in the early CE-500's, ("RCA" airplanes), allows each inverter to power a separate AC bus. The two inverters may NEVER power the same bus at the same time, nor may both AC busses be powered by only one inverter. With the inverter transfer switch in the "NORMAL", position, the number 1 inverter powers the "Flight Director AC Bus", and the number 2 inverter powers the "Radar AC Bus". Placing the inverter transfer switch in the "X-OVER" position allows the number 1 inverter to power the "Radar AC Bus", and the number 2 inverter to power the "Flight Director AC Bus". If one of the inverters should fail, the pilot may choose which of the two "AC" busses will be powered. During normal operation, both inverters are operating. If either inverter does not properly power it's respective bus, the appropriate light on the annunciator panel will illuminate: "F/D AC PWR" (Red) or "RAD AC PWR" (Amber). The master caution system will activate if the "F/D AC BUS" becomes unpowered.
The CE-500-275 and later, and all CE-501's, 550's, and 551's, sometimes referred to as "SPERRY" airplanes, have two inverters as well. The inverters on the "SPERRY" airplanes are more powerful. Either inverter can meet all demands for AC electrical power on the entire aircraft.
There is only one AC bus on the "SPERRY" airplanes. It is powered by the No. 1 or the No. 2 inverter. Inverter control is achieved with a three position switch. The positions are No 1 INV, OFF, and No 2 INV. After engine start, select one of the inverters to test it, then select the other for the flight. Alternate the use of the two inverters each flight. A red "AC Fail" light and the master caution system will alert the flight crew that the AC bus has become unpowered. If this occurs, select the other inverter. Don't run one and "Save" the other. To do so is asking for a failure. What is used often works. What is seldom used is more subject to malfunction due to moisture accumulation not burned off by operating the equipment.
The newest of the Citation aircraft have yet another AC system.
It consists of two inverters, one ON/OFF switch, an amber failure warning
light for each inverter and a test switch. The test switch is a three
position switch, spring loaded to center (OFF). Placing the switch
up simulates #1 Inverter failure and down simulates failure of Inverter
#2. If an inverter fails in flight, AC power is automatically restored.
The pilot may determine what inverter failed by looking at the inverter
failure lights.
|
|
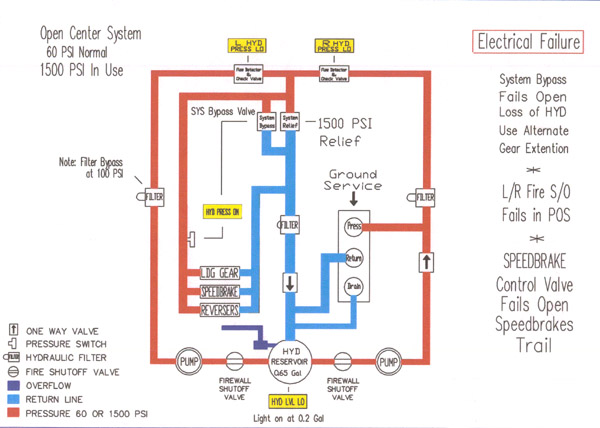
Skydrol 500 A, B, B-4, C, LD-4, Hijet, Hijet W, III, or IV. One pump per engine driven from N2 (turbine) by the accessory drive shaft. Open center system; normal pressure 60 PSI. System pressurizes to 1375-1500 PSI when landing gear, speedbrakes thrust reversers are operated. Because of normally low operating pressure, less heat is generated, therefore a smaller amount of hydraulic fluid is required.
Hydraulic system control valves fail open with loss
of main DC power. Loss of Main DC power will cause the hydraulic
system to be inoperative. Speedbrakes are 28 VDC control. If failed
deployed, pull speedbrake control CB, speedbrakes will trail due to blow
down by ambient air. Landing Gear is 28 VDC control. Free fall
by cable release of uplocks, and nitrogen bottle as alternate extension.
Brakes are a separate system. Brake pressure is supplied by the pilot's
feet. The nitrogen bottle may be used to apply the brakes, however,
no anti-skid or differential braking will be available. Some Citations
are equipped with a power brake and anti-skid system. These systems
are still separate from the main hydraulic system, but do require main
DC bus power to function.
 |
|
|
Note: The Flaps on the CE-560 are hydraulic.
|
|
The air conditioning & heating system for the CE-500 Series aircraft
is smaller, but of the same basic design as those systems used on current
generation airliners. Bleed air is provided by the turbine (N2) section
of the engines. This hot high pressure air flows through a device
known as an Air Cycle Machine, or "ACM". The ACM cools the air, and
allows it to flow into the cabin for air conditioning, heating, and pressurization.
In order to understand the ACM, and its functions, we must first review
some physical laws of heat transfer, and temperature vs pressure relationships,
as well as define some terms.
Heat
Heat is nothing more than the motion of molecules within a substance,
or the kinetic energy of the molecules. Heat will only pass from
hot to cold. A cold object can't pass heat to a hot one. When two
objects of different temperatures are exposed to each other, the heat energy
passes from the hot one to the cold one. A large temperature difference
between two objects transferring heat will result in a greater rate of
heat transfer than when the objects are closer to the same temperature.
Pressure
The pressure of a gas may be defined in terms of how hard it pushes
against its container or other objects it touches. The temperature
and pressure of a gas are related to one and other. If you increase
the temperature, the pressure will also increase if the volume is kept
constant. If you change the pressure of a gas, the temperature will change
as well. One may look upon the compression of a gas much like the
compression of a spring. It takes a certain amount of energy to compress
the spring a given distance. This energy is stored in the spring.
When the spring is allowed to expand, the energy used to compress it is
then released. When a gas is compressed, the energy shows up as an
increase in temperature and pressure. When the gas is allowed to
expand, (releasing the spring), the reduction in pressure will result in
an appropriate temperature drop. If some of the stored heat is allowed
to escape while the gas is compressed, the temperature of the gas after
expansion will be lower than it was prior to the gas being compressed.
Why? Heat is energy, and if heat energy is lost, a lower temperature
will result when pressures are allowed to return to their initial value.
Heat Exchanger
A heat exchanger is a device that allows us to transfer heat between
two fluids. (Fluids are liquids or gasses). The radiator on your
car is a water to air heat exchanger. It transfers heat from the
water to the air without allowing them to mix. The heat exchangers
used in the ACM are air to air heat exchangers. They allow the transfer
of heat from engine bleed air to ambient air. This cools the bleed
air, thus when the bleed air is allowed to expand, the temperature is lower.
Why? Because energy was extracted from it, and this loss of energy
shows up as a decrease in the temperature of the air.
Water Separator
Air can hold more moisture at a high temperature than at a low one.
When the air becomes, for whatever reason, unable to hold the moisture
it contains, the result is condensation. If the air is being cooled
enough to cause condensation, this could result in water droplets being
expelled from the air ducts. The passengers would not appreciate
this. A device is installed between the ACM and the cabin ducting
to extract the water from the system. This device is called a water
separator.
In order to get "Cold" air from hot high pressure bleed air, we must
use these physical laws to manipulate the pressure and temperature of this
air. Remember, heat is energy. When energy (heat) is removed
or "dumped overboard" by a heat exchanger, energy is lost. When energy
is lost somewhere in the system, the end result is that whatever comes
out at the end has less energy or is "Colder" than it would have been had
the heat not been ejected from the system.
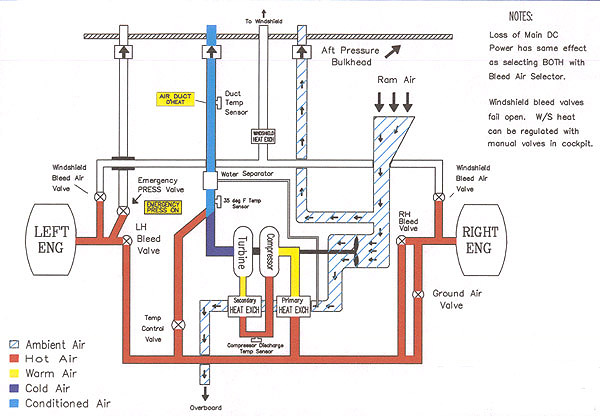
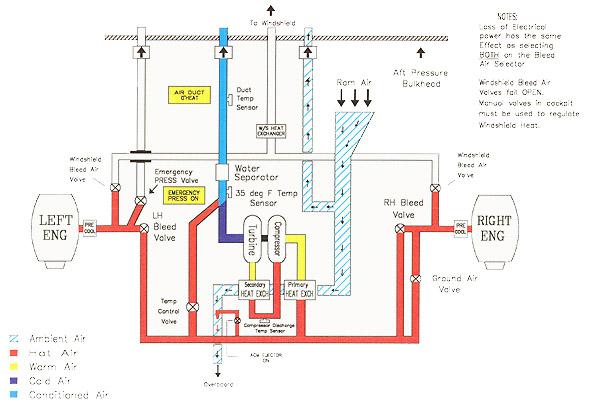
Let's take a short trip down "Air Cycle Machine Lane". Follow along
with the Citation Air Conditioning schematic drawing.
 |
|
|
 |
|
|
1. Ambient air enters the engine. Much of it is merely
flung out the back of the engine by the fan in order to produce thrust.
We are concerned with the air that continues into the engine's N2
compressor section, as this is the air used to pressurize and air condition
the aircraft. The air is COMPRESSED and HEATED by the N2 compressor.
Some of this hot high pressure air flows through a bleed valve to the "Air
Cycle Machine". The compressor LOANED energy to the air.
2. As the air passes through the "Primary Heat Exchanger"
energy is extracted from the air. Look at the heat exchanger like
a toll bridge. There is a price to get across, and that price is
heat. Now the air is cooler than it was prior to the heat exchanger.
3. Now the compressor in the "ACM" grabs the air and squeezes
it. The air heats up due to the increase in pressure. This
higher temperature will make the secondary heat exchanger more efficient
because of the greater difference in temperature between the air and the
heat exchanger itself.
4. The secondary heat exchanger now extracts more heat
from the bleed air as it flows through.
5. The bleed air is now allowed to expand as it drives the turbine
in the air cycle machine. This expansion results in a very large
temperature drop.
6. This "Cold" air is mixed with hot bleed air (by opening
the temperature control valve) that has not gone through the ACM thus allowing
the pilots to control the cabin temperature.
Bleed Air Selector Switch
The Pressurization Selector switch has several positions. It is controlled by 28 volt DC. Positions and functions are as follows:
OFF -- Flow control valves closed. No bleed air enters the cabin through the air cycle machine, or otherwise.
EMGY -- Raw bleed air from left engine. Left throttle controls cabin temp.
LEFT --Bleed air from the left engine through air cycle machine.
RIGHT --Bleed air from the right engine through air cycle machine.
BOTH - Bleed air from both engines through air cycle machine.
BOTH HI - Bleed air from both engines as in both position
except the flow
control valves are full open. Cabin airflow is unregulated and varies
with turbine RPM.
GROUND - Provides air cycle machine with one and one half
times as much air
as it would receive in the BOTH position. (18#/min) Used for
increased cooling on the ground ONLY! In GRND, bleed air comes from
the right engine. Bleed air GROUND is PROHIBITED in flight.
Loss of main DC power has the same result as if BOTH were selected as the pressurization source. The left and right bleed air / flow control valves fail open, and the emergency pressurization valve fails closed. Temperature control will remain in the position that existed at the time of the failure. If one of the engine bleeds were isolated because of air conditioning smoke, that engine may need to be shut down after the electrical failure in order to prevent smoke from entering the cabin again and making you gag, choke and die for no good reason.
OXYGEN SYSTEM
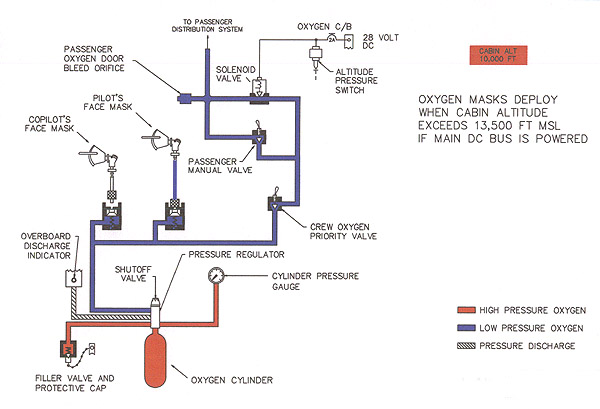
The Citation is equipped with a supplemental oxygen system. It
provides the pilots with 100% or diluter demand oxygen via a masks located
in the cockpit. The passenger oxygen is supplied by continuous flow masks
that drop from the overhead when needed. The oxygen system is not
used during normal operations except to verify proper operation during
preflight. The system pressure for both the standard and optional
system is 1600 to 1800 PSI, with a maximum pressure of 2000 PSI.
Thermal relief is provided through a green blow out disk located on the
right side of the nose. The blow out disk for the tailcone mounted
oxygen bottle is on the left aft fuselage.
 |
|
|
OXYGEN BOTTLE
The standard oxygen bottle has a capacity of 22 cubic feet or 500 liters.
It is located under the right nose baggage compartment floor. It
is serviced via an access door on the sidewall of the baggage compartment
just below the locking mechanism.
The optional oxygen bottle has a capacity of 64 cubic feet or 1455
liters. The optional oxygen bottle may be installed in the nose or
the tailcone compartment.
A pressure regulator reduces the oxygen pressure to about 70 PSI to
supply the masks. The pilot's masks are the diluter demand type,
providing diluted or 100% oxygen to the flight crew. Normal or 100%
is selected by moving a small lever on the masks themselves.
OXYGEN USE
We all know why the oxygen system is installed in a pressurized airplane.
It makes survival possible if cabin pressure is lost at very high altitudes.
It can be of value in other situations as well. What if you had a device
that would improve your night vision, and make your mind work more clearly
toward the end of a long flight? You do! The oxygen system.
It can be used any time want it. Don't hesitate to take a few whiffs
from the Oxygen mask prior to descent & landing, or any time you feel
it necessary. The 30 or so bucks it costs to refill the bottle once
in a while is insignificant compared to the cost of one mistake.
It's there for your use, go for it!
|
|
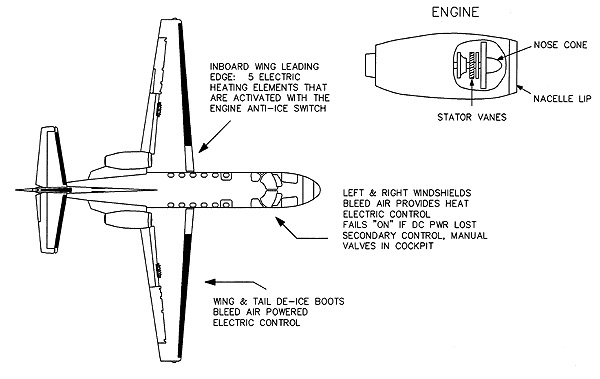
Pitot Heat - 28 VDC. It heats pitot tubes, static ports, and angle of attack probe. Ground operation is limited to two minutes.
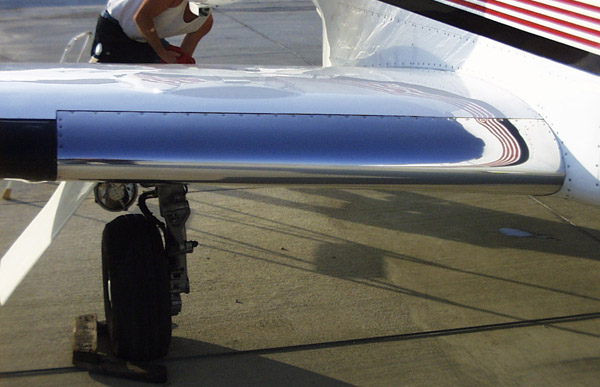
Engine Anti-ice: Turning on engine anti-ice
provides:
1. Power to the five heating elements in the 53" CE-500, and 61" CE-550
section of the wing. Thermostat regulates temp from 60 to 160 F.
2. Turns Ignition ON.
3. Opens cowl and stator valves by removing the power that keeps
them closed, if N2 is 60% or higher.
4. Opens cowl and stator valves by removing the power that keeps
them closed, if N2 is 60% or higher.
Windshield - Bleed air over the front pilot's windows, 28 VDC and manual control. Isopropyl alcohol for captain's windshield as back-up if air system fails. A 10 Minute supply is all you get.
Airframe - De-ice boots on flying surfaces,
28 VDC control. Boots are inflated by bleed air through pressure regulators.
Cycle time is 12 seconds; left stab and rudder inflate for six seconds,
then wings and right stab inflate for six seconds. Cycle may be interrupted
by placing switch to reset.
 |
|
|
 |
|
|
MISCELLANEOUS
;
CE-500/501 CE-550/551
Maximum water or slush on runway 0.75 IN
0.4 IN
Gyro Pressure is 2.0 to 3.0 PSI.
Emergency Air Pressure. Normal 1800 to 2000 PSI Caution 1600 to 1800 PSI
Maximum Differential Cabin Pressure
|
|
|
|
|
|
|
|
|
|
|
|
|
|
|
You can figure out quite a bit about an airplane if you know what the valves do! What do the valves on the Citation do when electrical power is lost? Some fail to the open position, some fail closed, and some remain in their last position.
Valves That Fail Open
Anti-Ice
· Engine Cowl (2)
· Engine Stator (2)
· Windshield Bleed Air Shut-off (1)
Fuel
· Motive-Flow Shut-off (2)
Hydraulic
· System Bypass (1)
· Speed Brake Safety (1)
Air Conditioning
· Flow Control and Shut-off (2)
Valves That Fail Closed
Pressurization
· Emergency Pressurization (1)
· Ground air conditioning valve (1)
Valves That Fail in Last Position
Fuel
· Fuel Firewall Shut-off
· Fuel Crossfeed
Hydraulic
· Hydraulic Firewall Shut-off
Air Conditioning
· Cabin Temperature Control
Engine Fire Switch Functions
· Fuel Firewall Shut-off F/W SHUTOFF Light illuminates
· Hydraulic Firewall Shut-off F/W SHUTOFF Light illuminates
· Opens Generator Field Relay GEN OFF Light illuminates
· Arms Fire Extinguisher Squibs BOTTLE ARMED lights illuminate
Switches
|
|
The engine fire switch will illuminate when the fire detection loop is shorted or heated to its alarm value. The fire detection test checks the continuity of the system, but does NOT heat the loop to its alarm value as on some other transport category aircraft. When pushed, the fire switch changes the positions of the fuel and hydraulic firewall shutoff valves. Valve position is closed when the respective fire wall shutoff light is illuminated, except during the engine fire test. The fire switch isolates the engine from combustible fluids, (hydraulics and fuel), trips the generator by shutting down the engine, and arms the fire extinguishing bottles. Pressing the "Bottle Armed" lighted switch fires a squibb that discharges one fire extinguisher into the nacelle of the selected engine. Either or both engines may be extinguished by either fire bottle. Firewall shutoff valves are 28 VDC motor driven. With loss of main bus power, they fail in their last position.
System Switches
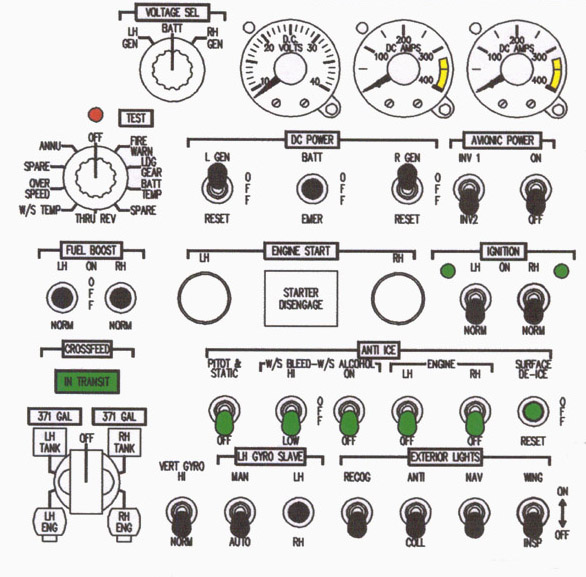
VOLTAGE SELECTOR
The voltage selector allows the volt meter to read the voltage from
the left or right generator, or the battery. It is usually used to:
1. Confirm minimum battery voltage for start.
2. Troubleshoot a malfunctioning generator.
3. Verify opening of the battery relay when emergency is selected with
the battery switch.
BATTERY SWITCH
ON
Bat bus, left & right DC bus, and emergency DC bus is powered
by the battery. If on line, the generators will power the LH,
RH, and battery bus.
Emergency bus is powered through the battery.
OFF
Generators can power the LH, RH, and battery bus. No battery
charging occurs, and the emergency DC bus is unpowered.
EMERGENCY - Battery Powers emergency DC Bus
· Com 1
· Co-Pilot's HSI
· Nav 2
· Cockpit Floods
Generators may power the main busses. NO BATTERY
CHARGING OCCURS IN THIS MODE. Battery Emergency can be used to deal with
a thermal runaway, or to load shed in the case of failure of both generators
or an electrical fire. For Elect. Fire - BAT EMGY, GEN's OFF. This
will result in loss of main DC Bus power. Consider the effect on
the aircraft systems.
AC SYSTEM
Early serial number CE-500's had two inverters, each powering different
items, and a crossover switch that provided the following:
With XOVER switch in NORM, #1 INV powers the flight director,
Captains gyros, Co-pilots RMI, and Radar Altimeter. #2 INV powers
the WX Radar.
In XOVER, each INV powers the opposite AC Bus.
Note: Inverters CE-550ís power all AC items on the aircraft. If one quits, select the other. Some Citation's have a two inverter system with automatic switching. An amber # 1 or # 2 inverter failure light illuminates to inform you of the failure.
ROTARY TEST SELECTOR
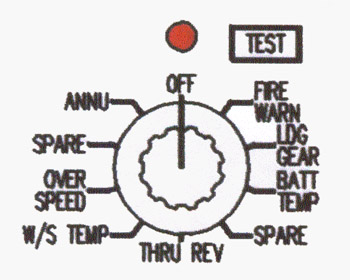
LDG GEAR - Illuminates gear unlocked, nose, LH, RH lights, and sounds gear warning horn. Cancel horn by pushing horn silence button.
BAT TEMP - Causes Bat O'heat light to flash, activates master caution system, and causes battery temp gauge to read 160 F.
THRU REV - Illuminates lights on thrust reverser warning panel when selected.
W/S TEMP - Illuminates windshield overheat light when selected if windshield bleed air switch is in the high or low position.
OVERSPEED Causes overspeed warning horn to sound ( intermittent tone).
SKID WARN Causes rudder pedals to emit high frequency vibration.
ANTI SKID Illuminates lights on power brake warning panel.
ANNU Illuminates all annunciator lights and activates master caution system. Master caution canceling can be tested in this mode.
IGNITION - The Ignition system has no duty cycle limitations. In the ON position the Ignition is ON. In the NORM position, Ignition is off except during start, or when engine anti-ice is selected.
FUEL BOOST
ON - Boost Pumps receive 28 volt DC power.
They're ON!
OFF - Boost Pumps function as appropriate during
crossfeed and engine start.
NORM Boost Pumps run during crossfeed, start, & when less than 5 PSI is sensed by the fuel pressure switch. The fuel boost pump switches in the citation are generally placed in the normal position prior to the first flight after manufacture, and left their until the aircraft dies of old age. In the normal position, the pumps run only if and when they are needed. An exception to this rule is made when Avgas is used as an alternate fuel. The pumps are then selected ON for the duration of the flight.
CROSSFEED - When the left or right tank is selected, the selected tank is the only fuel source for any operating engine(s), as both the boost pump and the ejector pump are off on the side that was not selected.
EXAMPLE: Crossfeed selector placed in the LH TANK position causes:
1. Left fuel boost pump turns on regardless of switch position.
2. Fuel crossfeed valves open. (Green intransit light comes on
for 2 sec.)
3. Right hand motive flow valve closes turning off the right hand ejector
pumps.
In this situation, the left boost pump supplies the pressure to the
right engine driven fuel pump.
|
|
|
|
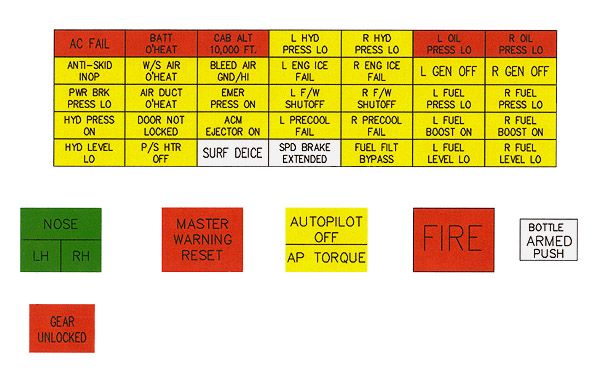
The following items will activate the Master Caution System:
| Cabin Altitude 10,000' or above.* |
| Left or right engine oil pressure below 35 PSI |
| Loss of more than one generator. |
| Flight Director AC power loss. |
| Battery overheat.* |
| Reverse thrust selected in flight. |
ANNUNCIATOR LIGHTS
MASTER WARNING Indicates that one of the red annunciator lights is illuminated, both generators have failed, or reverse thrust has been selected.
AC FAIL Indicates that satisfactory power is not being supplied to the primary AC buss. CE-500 # 001-274, turn failed inverter off and select crossover. Buss will be powered again, radar will be inop. CE-500 # 275 & Sub, CE- 501, 550, & 551 select other inverter and AC is restored with no loss of equipment. Some late model Citation II are equipped with automatic switching to change inverters in case of a failure.
BATT O'HEAT Steady, battery temperature is 145 deg F to 160 deg F. Place battery switch to "Emergency". Check battery and generator voltage to verify opening of battery relay. Monitor battery temperature. Flashing, battery temperature is 161 deg F or higher. Place battery switch to "Emergency", Check battery and generator voltage to verify opening of battery relay. Land at nearest suitable airport.
CABIN ALT 10,000 FT Initiate use of Oxygen for CREW first, then passengers. If cabin pressure can not be restored immediately, proceed with emergency descent.
L & R OIL PRESS LOW Engine oil pressure gauge reads below 35 PSI. Shut down engine if situation permits.
GEAR UNLOCKED Indicates landing gear is not locked in the up or the down position. Cruise speeds may be slower, gear damage may occur if Vle is exceeded. Flight may not have a happy ending after landing with this light on.
AMBER
L & R HYD PRESS LO Hydraulic pump pressure output differential of 25 PSI in open center mode or 170 PSI when the system is pressurized. With one light on, speedbrake, gear and reverse thrust operation will be slower. Both lights on, hydraulic are inop.
HYD PRESS ON Main system bypass valve is closed. Hydraulic system is pressurized to 1375 - 1500 PSI. Normally on during hydraulic system use. If it remains on after hydraulic function is complete, pull gear, speedbrake and thrust reverser control circuit breakers. If light does not go out, land and call maintenance.
HYD LEVEL LO Hydraulic reservoir contains 0.2 gal or less hydraulic fluid. Have system serviced to .5 gal. If quantity was full at takeoff, a leak may exist. Plan the remainder of the flight accordingly. Call maintenance.
ANTI-SKID INOP Anti-lock braking is not available. Use manual brakes.
PWR BRAKE PRESS LO Power brake system is inop. Anti-skid will not function. Switch to manual braking.
W/S AIR O'HEAT With window heat on, W/S air is to hot. If in high, select lo. If in low, select off for a short time. With window heat off, there is pressure in the ducting. Crack the manual valves to relieve the pressure.
AIR DUCT O'HEAT The air in the supply duct from the ACM to the cabin is to hot. Switch to manual temperature control and select a cooler temperature.
DOOR NOT LOCKED One of the foreword baggage doors, the main entry door, or the tailcone compartment is not locked. Do not take off until all doors are properly secure.
P/S HTR OFF Less than 2 Amps current through the pilot tubes and static port heating elements. Angle of attack probe is also not heated.
BLEED AIR GRND/HI Bleed air is selected to the ground or both high mode. Reset to normal prior to takeoff.
EMER PRESS ON Emergency pressurization (Left engine) is being used. (Automatic or manual selection). Cabin temperature is controlled with the left thrust lever.
ACM EJECTOR ON CE-550, 551 & 560 only. ACM bleed air ejector is operating. Normal when on the ground at low engine power settings. Should extinguish during takeoff roll.
L & R ENG ICE FAIL Engine anti-ice is ON, and at least one of the following conditions exists: One or more heating elements is out in the wing leading edge, Wing leading edge has not reached proper temperature, N2 RPM is below 60%, Stator valve is not open, Cowl valve is not open, or Nacelle lip has not reached proper temperature.
L & R F/W SHUTOFF Respective firewall shutoff valves are closed. (Fuel and Hydraulics). Valves may be opened by pressing engine fire switch.
L & R PRECOOL FAIL Reduce power on that engine if situation permits. If unable, select opposite engine as sole source of pressurization. Call maintenance to investigate cause.
FUEL FILT BYPASS One of the fuel filters as a 3.75 PSI pressure differential. It has or will shortly by bypass. Ice in the fuel is a common cause. Call maintenance.
L & R GEN OFF Left or right generator is not connected to the electrical buss system. Check volts and amps and reset if appropriate. Some download may be required for one generator operation in icing conditions.
L & R FUEL PRESS LO Fuel pressure on that side is less than 5 PSI. Will cause fuel boost pump to come on if selected in the normal position.
L & R FUEL BOOST ON Fuel boost pump is receiving electrical power. This is normal during engine start, crossfeed, low fuel pressure situations with the fuel pump in "Normal", and whenever the fuel pump switch is "On".
L & R FUEL LEVEL LO Float switch in the respective
tank indicates about 20 minutes fuel remaining for one engine in that tank
at normal cruise power.
WHITE
SURF DEICE Surface De-Ice boots are in operation.
SPD BRAKE EXTENDED Speedbrakes are extended and locked.
|
|
AOA Indicator
|
|
Here are some basic flight profiles that I have used over the years. They are not the only way to fly the airplane, but have worked for me since I started giving training and checkrides in the Citation a little over 20 years ago. In the event of a difference between this and the Aircraft Flight Manual, the flight manual is the document to follow.
Steep Turns
1. Enter at 200 KTS indicated AIRSPEED.
2. Bank aircraft 45 deg. As you pass 30 deg of bank, pitch
up 2 deg. Add power to maintain AIRSPEED.
3. Lead roll out by 15 deg. Passing 30 deg bank, pitch
down 2 deg to maintain altitude.
4. Maintain 200 KTS and assigned heading.
Stall - Cruise Configuration
1. Compute Vref & set AIRSPEED bugs.
2. Maintain assigned altitude and set power to 50%
N1.
3. Trim for level flight until passing 140 KTS.
Maintain altitude with necessary back pressure.
4. At first indication of a stall, throttles
to " MAX POWER "
5. Call " MAX POWER Flaps Approach.
6 Reduce pitch ONLY to the extent necessary
to eliminate symptoms of the stall.
7. Reestablish assigned altitude.
8. At Vref + 10 KTS, call " Flaps Up, After Takeoff
Checklist. "
9. Maintain AIRSPEED and altitude as directed.
Stall - Takeoff Configuration
1. Compute Vref, set AIRSPEED bugs & select flaps 15.
2. Maintain assigned altitude and set power to 50% N1.
3. Trim for level flight until passing 140 KTS.
4. Maintain altitude with necessary back pressure.
5. At first indication of a stall, advance throttles & call
" MAX POWER ".
6. Reduce pitch ONLY to the extent necessary to eliminate symptoms
of the stall.
7. Reestablish assigned altitude.
8. At Vref + 10 KTS, call " Flaps Up, After Takeoff Checklist.
"
9. Maintain AIRSPEED and altitude as directed.
Stall - Landing Configuration
1. Slow to flap speed, set 60% N1 & Set bug to Vref.
2. Maintain assigned heading & altitude.
3. Below 202 KTS, " Flaps 15 deg".
4. Below 176 KTS Gear Down, perform Landing Check
5. Below 176 KTS, " Full flaps. " trim to Vref. Establish
a 400-700 feet/min sink rate at Vref.
6. Level off at designated altitude W I T H O U
T increase in power
7. Maintain altitude until first indication of a
stall. (Shaker or stall lights)
8. Apply MAX power lower nose only as much as required
to eliminate the stall warning.
At Vref minus 10 KTS
M I N I M U M speed, call for " Flaps 15 deg", and increase the
pitch attitude to 10 deg nose
up at about 1 deg / sec.
9. When VSI & Altimeter indicate positive rate of
climb call " Positive rate, Gear Up ".
10. Establish 7.5 deg nose up attitude.
11. At Vref + 10 KTS, Call " Flaps Up, After Takeoff Checklist
".
12. Return to entry heading and altitude or as directed.
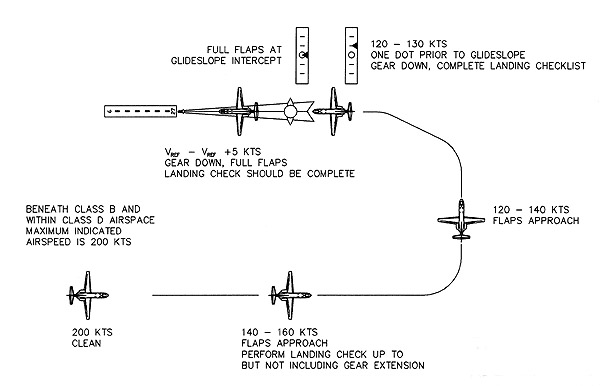
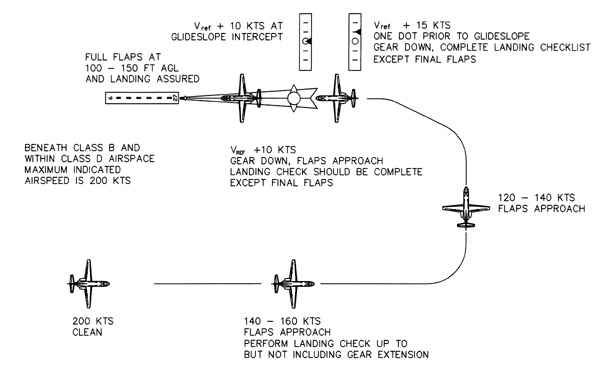
ILS Approach - Two Engines
1. Intercept LOC at 140-160 KTS and Flaps 15 deg.
2. One dot prior to intercepting Glide Slope, call " Gear Down
Landing Check ".
3. When ON the glidepath, call " Full Flaps ".
4. Establish Vref to Vref + 5 KTS & track LOC & GS until
Minimums.
ILS Approach - One Engine
1. Intercept LOC at 140-160 KTS and Flaps 15 deg.
2. When ON the glidepath, call " Gear Down Landing Check
".
3. Establish Vref + 20 KTS & track LOC & GS
4. At 100-150 Ft AGL, Full flaps, power idle & land.
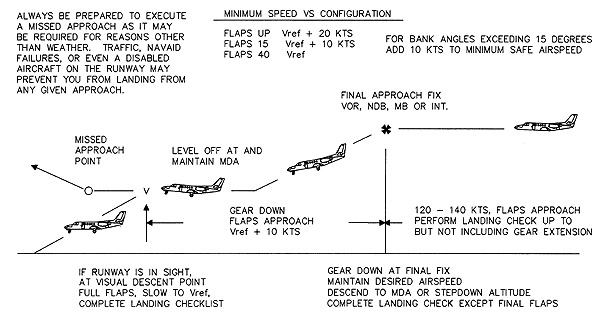
Non Precision Approach - One or Two Engines
1. Intercept Final Approach Course at 140 KTS and
Flaps 15 deg.
2. Crossing Final Approach Fix, call " Gear Down
Landing Check ".
3. Descend to and maintain MDA until Field in Sight
or MAP is initiated. ( As Appropriate ).
4. If Landing is to be made, call " Full Flaps "
when intercepting a glidepath appropriate for a
normal landing. For one
engine INOP, Vref + 10 KTS until 100 feet AGL, then " Full
Flaps" so as to descend thru 50
ft AGL at Vref as in a normal landing.
No Flap Approach
1. Vref + 30 KTS until established on Final Approach.
2. Vref + 20 KTS on final. ( Vref + 15 KTS for CE--550 / 551
)
3. Approach angle NORMAL. A flat approach will usually
result in a longer landing roll.
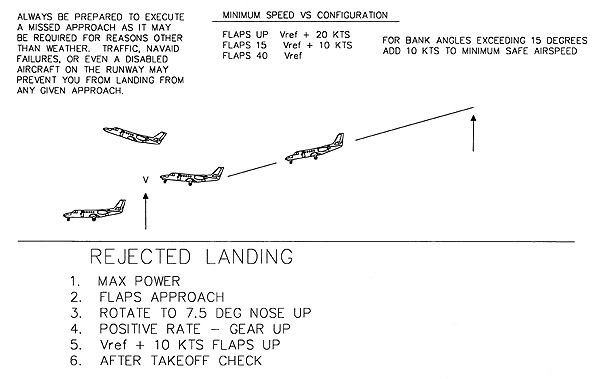
Go Around or Missed Approach
1. "Max Power", Rotate to 10 deg, " Flaps 15 deg".
2. Positive Rate of Climb, " Gear Up ", Vref + 10, " Flaps up,
After Takeoff Checklist ".
3. Climb at 200 KTS.
4. Engine Failure or Fire Checklist if Appropriate.
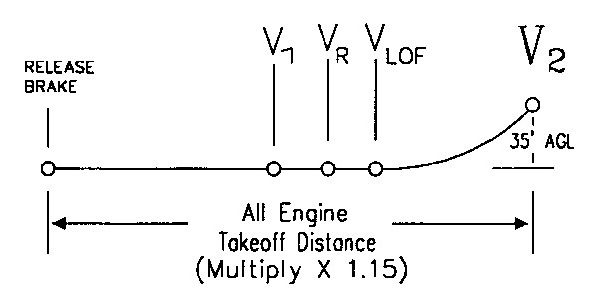
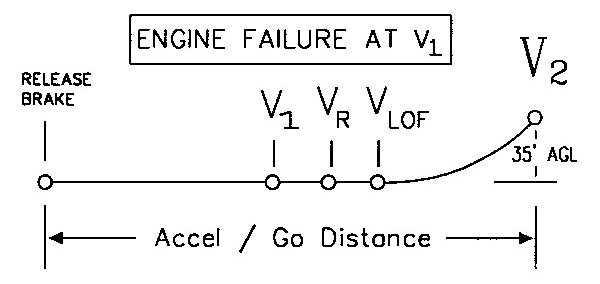
Takeoff
1. Set V2 on Capt. Airspeed & V1 on Co-Pilots Airspeed.
2. At V 1, BOTH hands on Yoke.
3. Vr, Rotate to 15 deg ( 2 eng ) 8 deg ( 1 eng ).
4. Climb at 15 deg pitch, ( 2 eng ) or V 2 ( 1 eng ).
5. At 400 ft & V2+10 KTS, "Flaps Up After T.O. Check ".
6. Engine Failure or Fire Checklist if Appropriate.
7. Climb 200 KTS to 3000 AGL then 250 Kts, or Venr, as
appropriate..
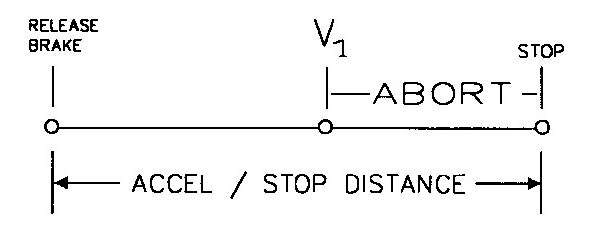
1. Proceed as in normal takeoff until malfunction dictates that
the takeoff be rejected.
2. Capt. calls "Abort" (Co-Pilot may call Abort if Capt elects
to delegate that authority).
3. Thrust levers to idle
4. Speedbrakes extend.
5. Wheel brakes as necessary.
6. Thrust Reverse OR Dragchute deploy. (Never Both at the
same time!!)
7. If another takeoff is contemplated consider brake energy &
appropriate turnaround time.
Emergency Descent
1. Oxygen masks on within 5 sec of cabin pressure
loss.
2. Check passenger oxygen masks deployed.
3. Select Oxygen mask microphone.
4. Ignition ON.
5. Thrust levers to idle.
6. Speedbrakes Extend.
7. Auto Pilot OFF.
8. Initiate 45 deg bank if desired.
9. Vmo/Mmo minus 10 kts to 14,000 or MEA as
required.
10. Clean up & proceed to nearest suitable airport
if appropriate. Condition of aircraft or
reduced range due to low
altitude may make flight to original destination unwise.
Backto: Airplane DriverHome Page